
Taizihao
Smart Detect
A professional label printing package built on three ideas: editing stripped to the essentials, mistakes caught automatically, and shift changeovers in one press. Design becomes simple, printing stays reliable, and handovers no longer interrupt production.
Caught at every step
Handovers made simple
Editing stripped to the essentials
Drag, click, and what you see is what you print — a professional label in 30 seconds with no design experience.
Automatic inspection and alarm
Content is checked automatically after printing; a fault raises an audible and visual alert within a second and stops the bad label.
Efficient central management
Queue the changeover in advance and monitor and configure every machine from one place. Throughput rises sharply.


Mistake-proofing × minimal operation × shift queueing
Routine maintenance and calibration
Cleaning the print head and paper path regularly, and calibrating when needed, keeps prints sharp and extends the life of the machine.
Routine cleaning
→ Open the printer’s top cover
→ Take out the paper roll and the ribbon
→ Wipe the print head with a cotton swab moistened with medical alcohol
→ Let the alcohol dry completely before switching the printer back on
→ Use a dry cotton cloth or swab to wipe dust and debris off the sensor surface
→ When print quality or paper detection gets worse, moisten the cloth or swab with medical alcohol and wipe again
→ Let the alcohol dry completely before switching the printer back on
→ Use a dry cotton cloth or swab to wipe dust and debris from the platen roller and the paper path
→ Moisten the cloth or swab with medical alcohol and wipe again to remove any sticky residue
→ Let the alcohol dry completely before switching the printer back on
How often to maintain and calibrate
→ Press the calibration button on the upper right at the back once to locate the labels. When it finishes you can reload the blank labels that were fed through. Continuous paper does not need this.
→ Take out the paper roll and the ribbon, and give the machine a basic clean
→ Unplug the power cable
→ Cover it, or put it back in its box, and store it somewhere dry and out of direct sunlight
Taizihao Smart Label Printer · Specifications
Print settings and consumables
Controller · Inspection · Software · Interfaces and environment
Connecting the printer
Connect the printer and set it up

Connecting the printer and its indicators
Connect the power cable
Connect the power cable and switch on. To switch off, simply unplug it.
Connect the network cable
Connect the network cable to put the printer on the network.
Status indicator
A green light on the top front means the machine is ready and running normally.
Inspection alarm light
The inspection alarm light on the lower left of the machine turns red and sounds the alarm when a fault is detected (wrong label, missing label, contamination).

Open the software and scan for machines
Open printer management
Open the Taizihao Label Editor and click “Printer management” at the top. There are two buttons at the top of the page: normally Refresh is enough to get results straight away. If a machine is not found, use Scan to sweep the whole subnet — that takes noticeably longer.

Rename the printer (optional)
Give it a name
Click the pencil icon to the right of the machine (not the text button) to name the printer — “Moulding 1” or “Line A”, for example.

Set the print parameters
Media and print method
Click the gear icon to the right of the machine to open “Edit print settings”. Print speed and Print density are set automatically to the best values and are shown read-only. The two you can change are Label gap and Template mode.
Indicators and buttons
The indicator lights and button combinations tell you the printer’s state at a glance and cover the basic operations.
Indicator states
Button function

Buttons at a glance
Inspection alarm button
The round button on the front left of the top face. It lights up and sounds a tone when a fault is detected; press it to silence the alarm.
Calibration button
The button on the upper right at the back. Press once to feed a length of paper; press again while printing to pause, and once more to continue.
Feed button
The button on the lower right at the back. Press once to feed a length of paper; press once while printing to pause, and again to continue.
Quick start — your first label
Once it is connected, follow the steps below and your first label prints in about a minute.

Create a label template
Enter the size and apply
There is no “New template” button. Type the Width (mm) and Height (mm) in the top bar and press Apply — the canvas resizes to the label you are about to print.

Type the label text
Add text and paste it in
Click “Add text” in the toolbar and paste in what you want to print. The software lays it out to fit automatically.

Edit the label
Select, edit and lay out
You can select and edit part of the text, or edit the whole box if nothing is selected. For layout, text you have not edited yet responds to Auto layout, which fits it to the label.

Layers and size
Position, size and layer order
Selecting an object shows its exact position and size, which you can type in directly for precise placement.

Ruler guides
Guide line
Clicking on the ruler places a guide line at that point; press Clear guides to remove them.

Send to print
Choose a mode and print
Choose a printer. There are only two print modes: Single and Batch. Press Send to print to print (“Send to print” is a button, not a mode). The first time you send, the software asks you to confirm the template name before filing it; sending the same template again after that overwrites it in snapmark_doc.
Single print mode
Print one label and tear it off — for packing on the floor: finish a pack → tear the label off and apply it → print the next one.

Single mode and queueing
Select Single and send
After choosing a printer and the Single mode, the quantity box disappears and is replaced by Tear one, print one. Press Send to print and one label comes out; tear it off and the next one prints.

Queue a shift changeover
Open the template you want to queue
Choose a printer and select Single mode
Press “Queue print”
The queued template is visible on the printer management page

Changeover button on the floor
Press the changeover button on the machine
Once a job is queued, the operator only has to press the “Changeover button” on the machine to switch to the queued template and carry on printing. Nobody has to go back to the computer.
Batch print mode
Choose a printer, select Batch mode, enter a quantity, and press Send to print for a continuous run.

Batch print
Select Batch and enter a quantity
Choose a printer, select Batch mode, enter the quantity, then press Send to print. The machine prints that many labels in one run.
Printer management
Shows what each machine is printing now and what is queued. You do not have to save the template first — send or queue it and the software will ask you to confirm the template name before filing it.
About this screen
Running job
The template the machine is printing right now, with Single or Batch mode shown beneath it.
Queued job
Pressing the changeover button on the machine switches to it. Only one job can be queued at a time; queueing another replaces it.

Printer maintenance
Manage each machine’s inspection switch, push printer updates, and remove machines that have been retired.

Inspection switch
Inspection switch per machine
Each machine has its own switch in the Inspection column; click it to turn inspection on or off. Turning it off opens a confirmation window warning that print faults will no longer be detected. Offline machines cannot be changed.
Turn inspection on/off in bulk
Click Turn inspection on/off in bulk at the top and a window shows how many machines currently have inspection on. You can choose “Turn all on” or “Turn all off”, which applies to every online machine at once.

Printer update
Choose the update package
Click Printer update at the top. Normally Refresh is enough to list the machines; if one is missing, press Scan.
Tick the machines to update
It lists “current version → update to”. Tick the machines you want to update, or press Select all.
Update the selected machines
Update the machines one at a time and close the window when they have all succeeded. Do not send print jobs to a machine while it is updating.

Remove a printer
Only offline machines can be removed
The Remove button is only available when the machine is offline. Removing it only takes it off this list; it does not affect the machine itself, and it will reappear after a scan once it is back online.
Cancel running / cancel queued
In “Printer management”, each printer has two red buttons on the right that cancel its printing or its queued job. Cancelling stops the job completely.

Cancel running / cancel queued
Cancel running
Cancels the machine’s “running (printing)” job. The job stops completely and the Running column shows “Cancelled”. Note that labels already printed cannot be recovered.
Cancel queued
Cancels the machine’s queued job. The queue is cleared and the Queued column shows “Cancelled”.
State after cancelling
A field showing “Cancelled” has its button greyed out. To start again, send or queue a new template.

The editor can cancel too
Stop without changing pages
There is also a Cancel job button at the bottom right of the editor, which stops the current machine’s printing without changing pages. It is greyed out when there is no job running.
Set the time / unify the time zone
If your labels use a dynamic date field, the printer’s clock has to be right or the printed date will be wrong. You can set the time zone for every printer at once and let them synchronise automatically.

Set the time / unify the time zone
Open the time-zone settings
In “Printer management”, next to “Printer time zone” at the top, click “Change”.
Choose a time zone
Choose a time zone in the window that opens. There are three: Thailand/Vietnam (UTC+7), China Standard Time (UTC+8, the default) and Japan/Korea (UTC+9). Saving pushes it to every printer that is online at that moment.
Save and sync
Click “Save and sync” and the setting is pushed to every printer that is online at that moment. For a printer added or reinstalled later, open this window again while it is online and press Save and sync once more.
It will not print until the time is synchronised
This affects more than date fields. If the printer’s time is not synchronised, that machine cannot print at all, and sending a job shows “The printer’s time is not synchronised yet. Refresh on the printer management page and try again.” So check the time is correct before you send.
Dual-template printers
For the Taizihao Line series (networked). Two templates are stored in advance and switched automatically by the packing-machine signal, so nobody has to change over by hand.

Send two templates from the editor
Set the machine to dual template first
In “Printer management”, find the machine and click the gear icon on the right to open “Edit print settings”, then set “Template mode” to Dual template. Back in the editor, once you select that machine, “Send mode” on the right follows the machine and switches to “Dual template” automatically — you do not choose it — and the single-template option is greyed out. There is no print mode or quantity to set here.
Choose the target slot
Open the first template and set “Send to” to “Label 1”; for the second template choose “Label 2”.
Send and store
Press Send to print to store the current template in the selected slot. Switch to the other template, choose the other slot, and send again — both slots are then loaded.

Switched automatically by the packing-machine signal
Switched by the packing-machine signal
Connect the packing-machine signal and the machine switches between Label 1 and Label 2 automatically as the signal changes, with no manual changeover.
Check in printer management
The “Dual-template printers” area of “Printer management” shows the template and status of both slots — Running-1 and Running-2 — for every machine.
Convert to a field
Turn the text you change often into a “field”, then fill it in from Excel in bulk to generate many templates at once.
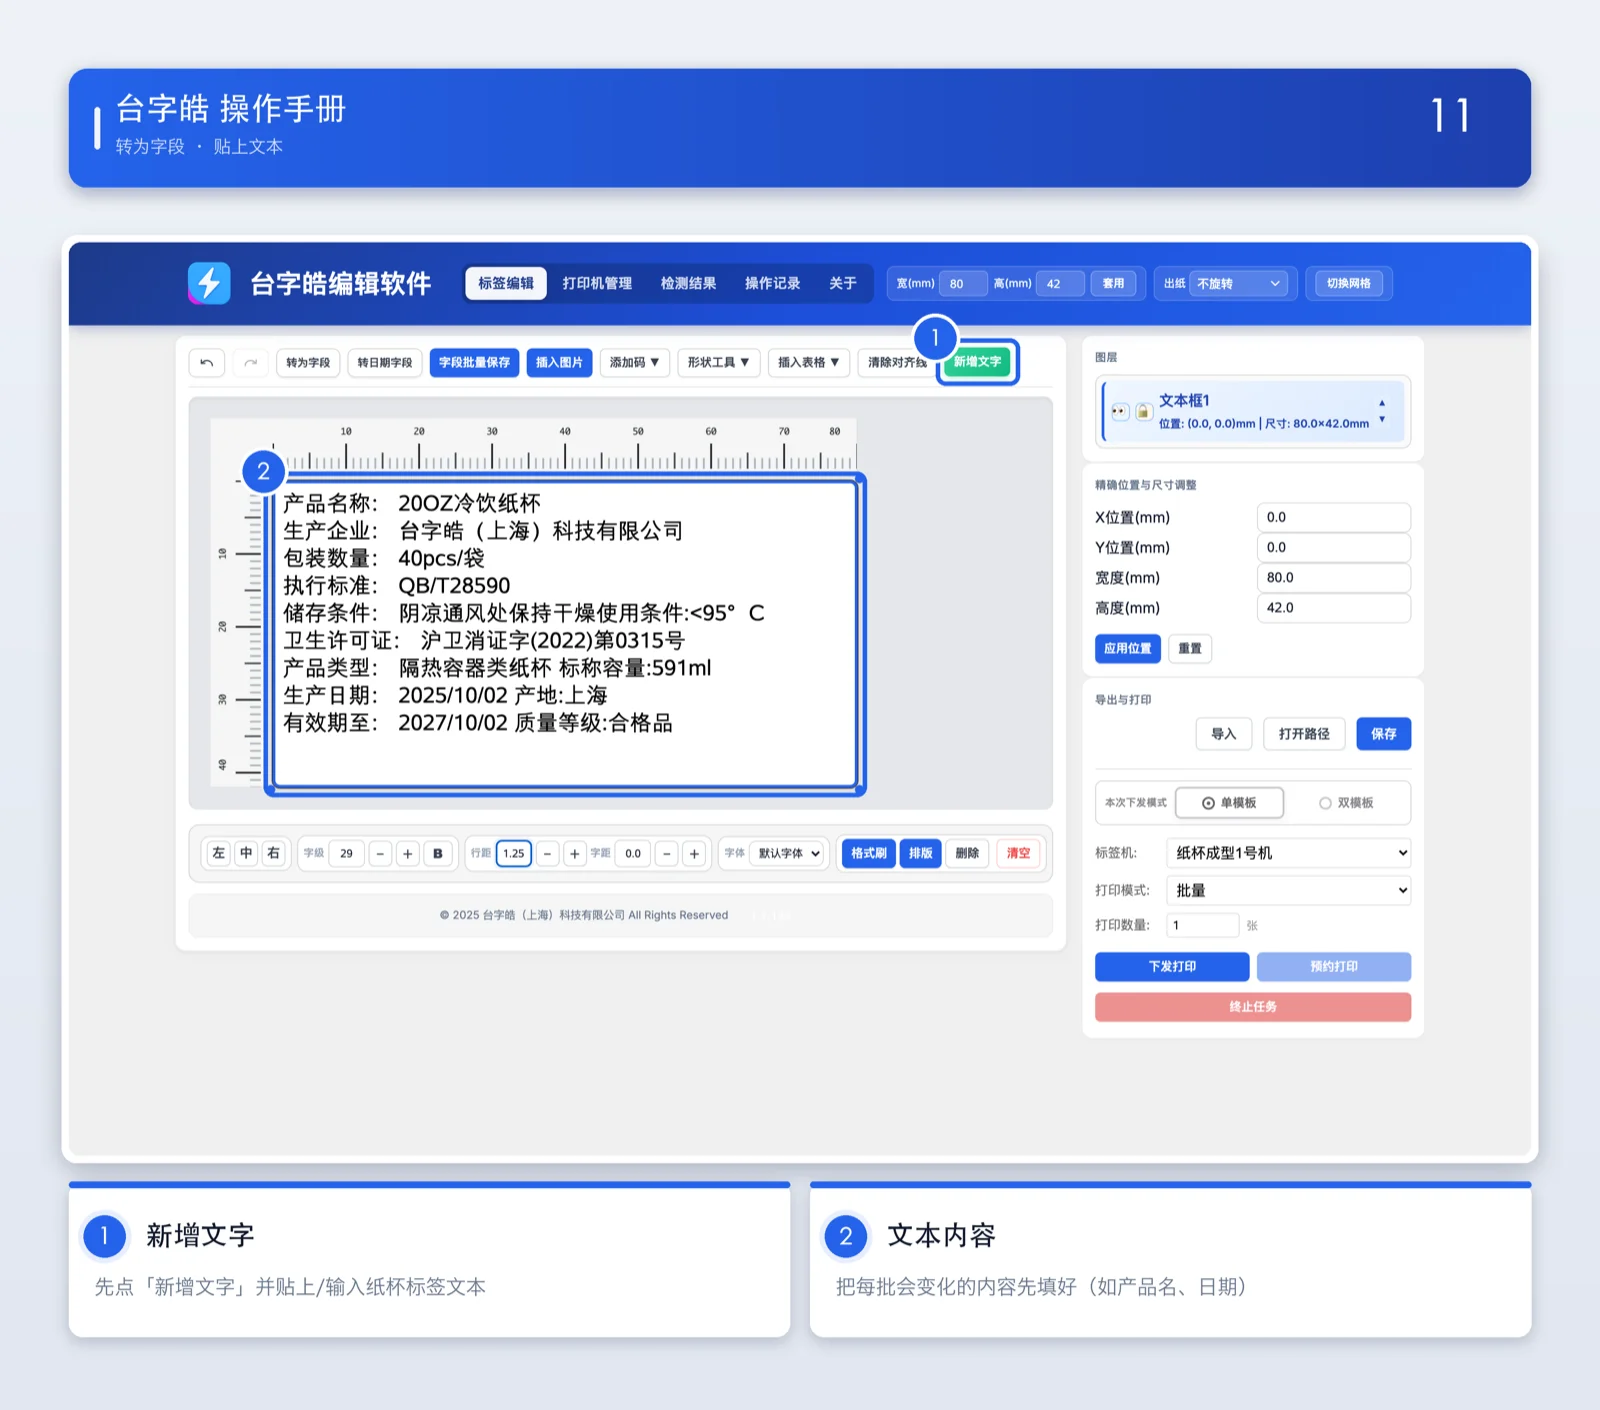
Paste the text
Paste into the editing area
Paste the content you change often — a product name or model number, for example — into the label editing area.
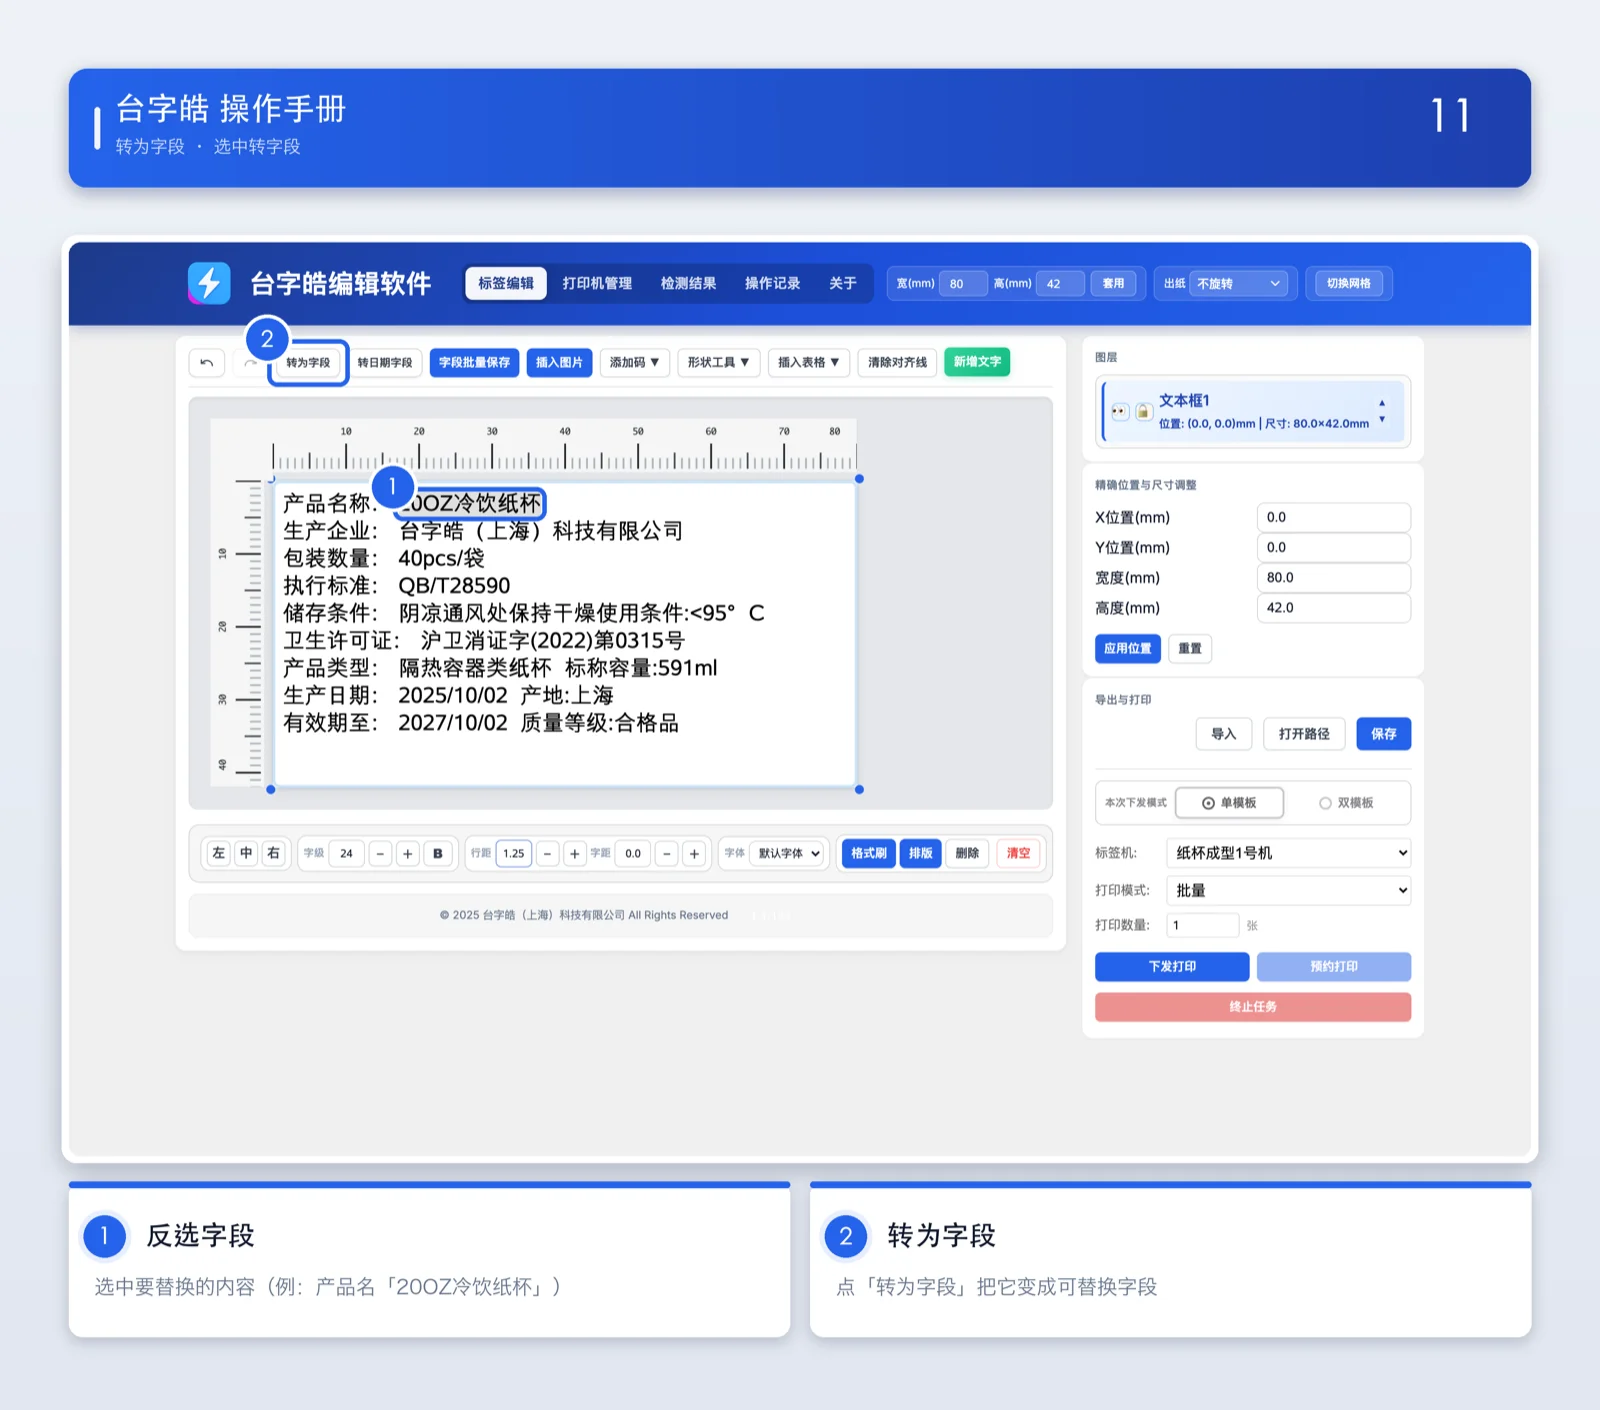
Select it and convert to a field
Select it and convert to a field
Select the text you want to replace and click “Convert to field”. The selected text turns into a field placeholder.
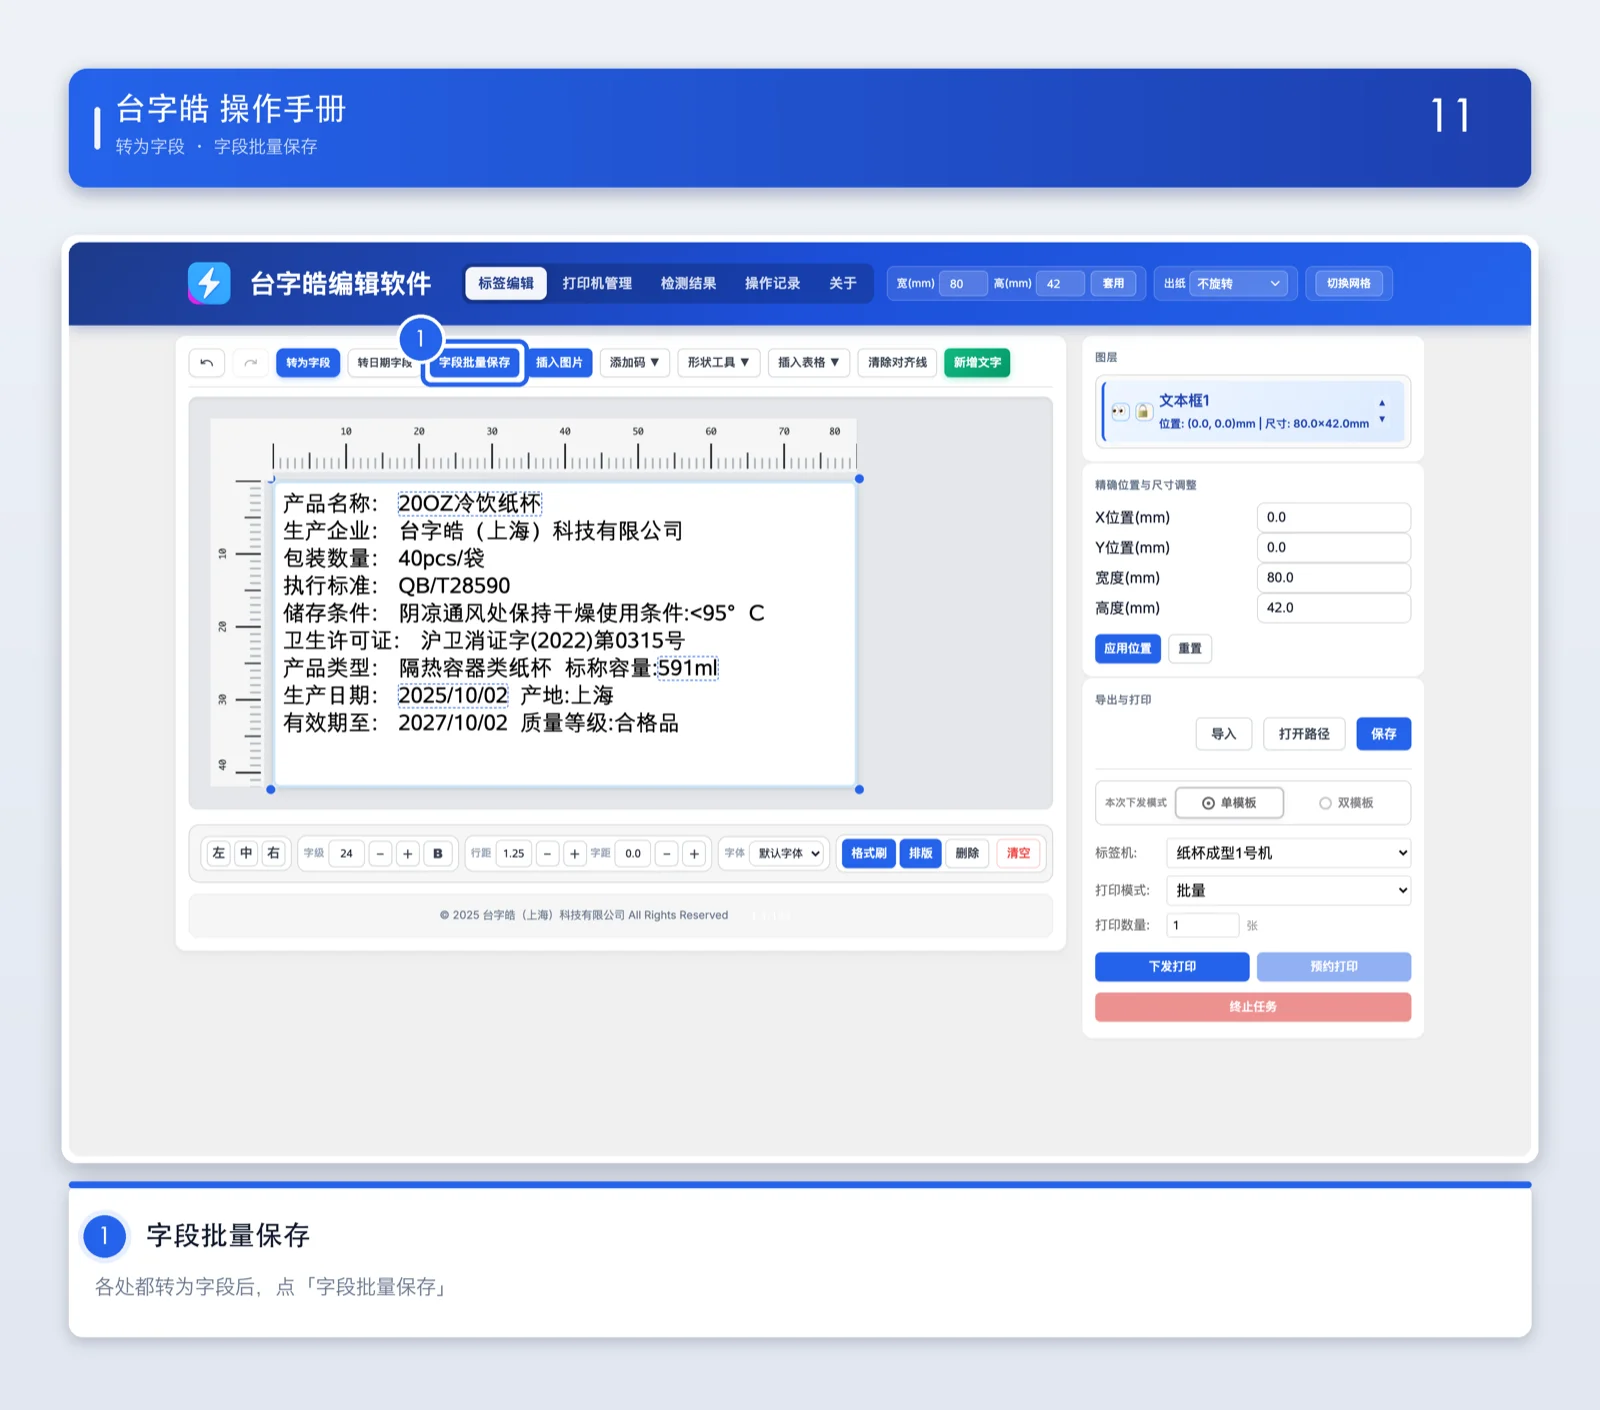
Batch save fields
Open the batch window
Once every piece of text you want to replace has been converted to a field, click “Batch save fields”. Note that this button is only for generating the Excel template — it does not print.
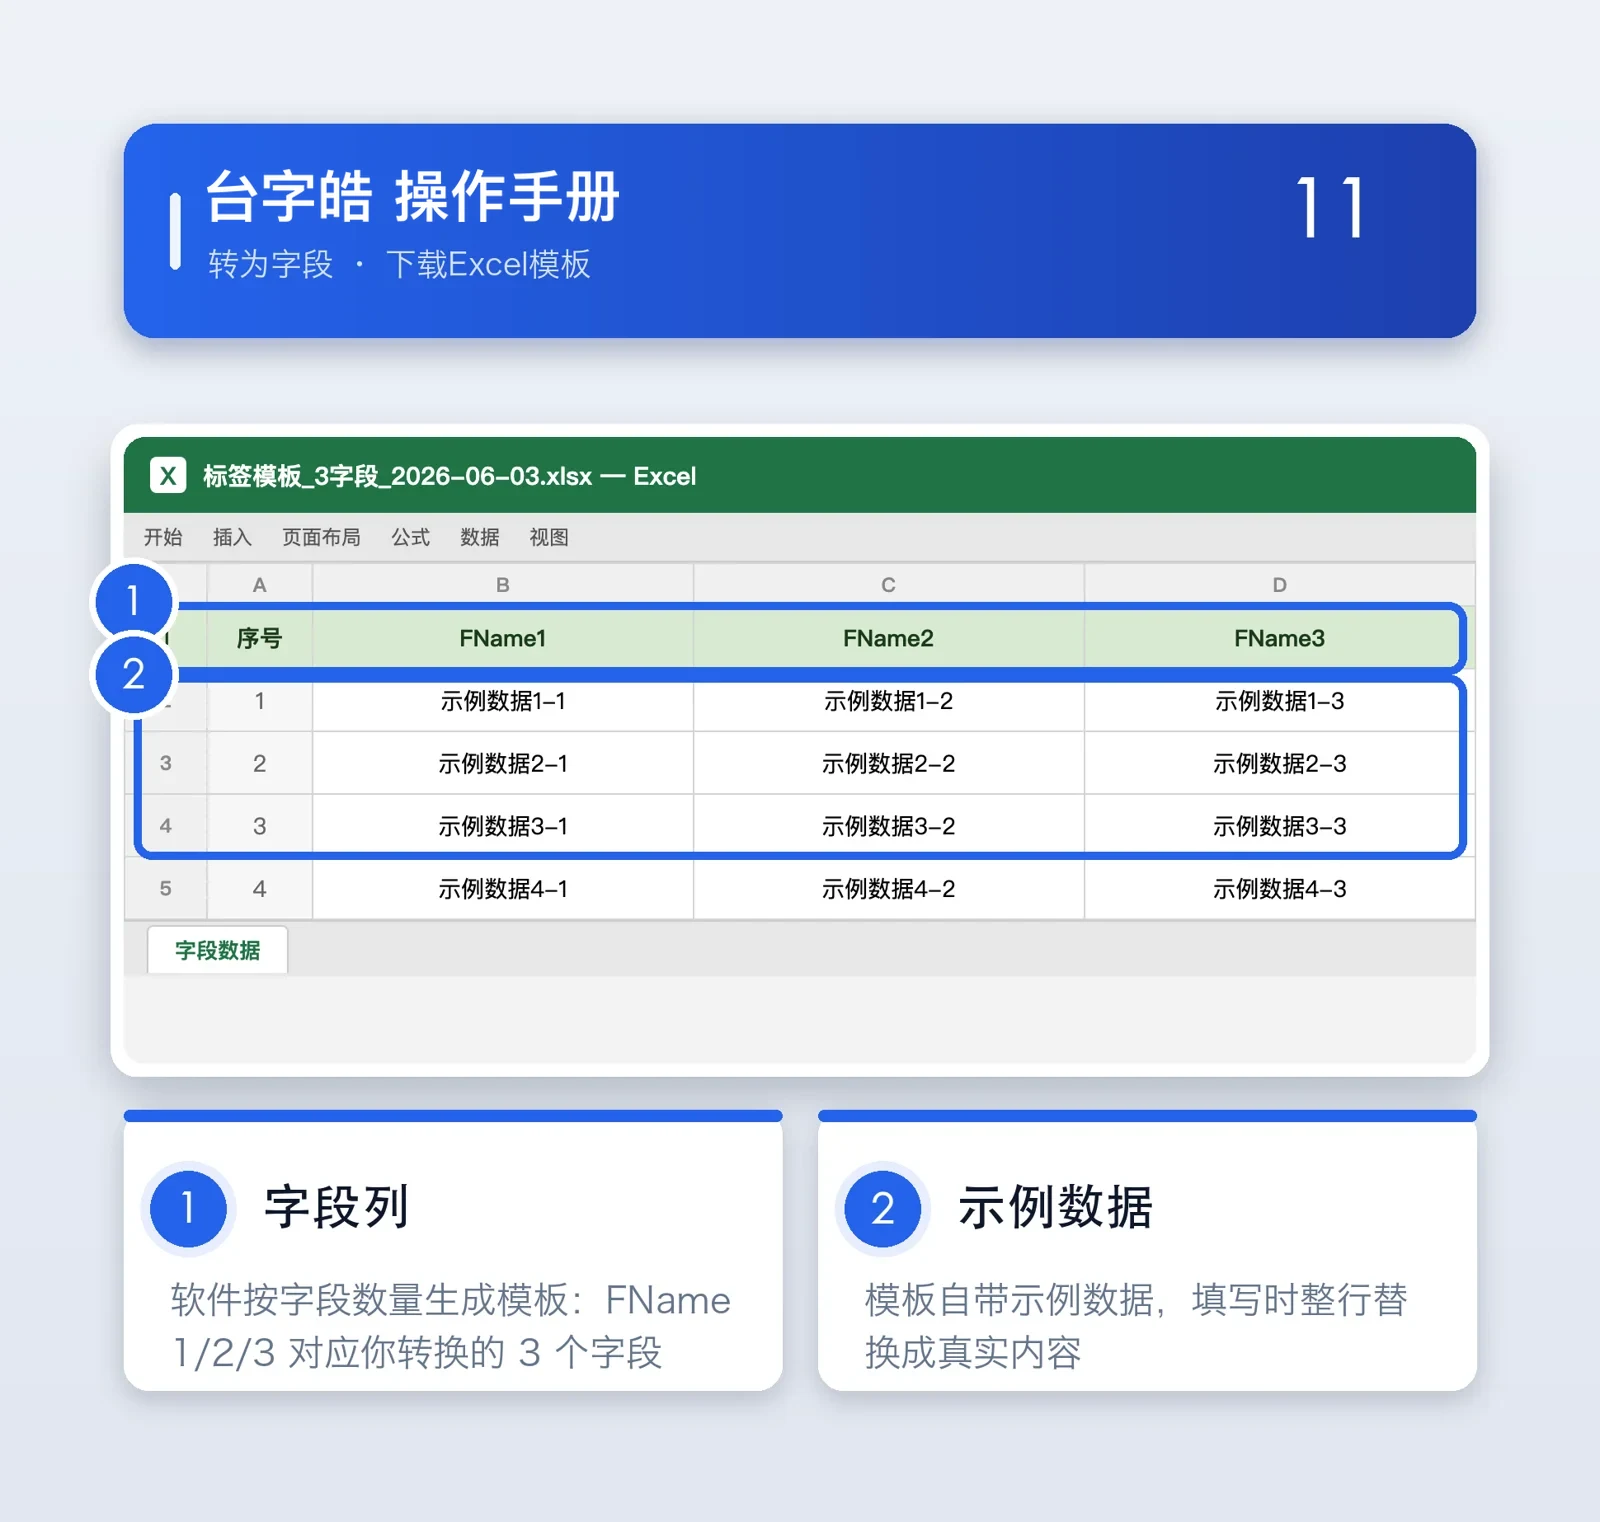
Download the Excel template
Generate the header row
Click “Download Excel template” to generate a header row matching the number of fields. In the file you download, the first column is File name; the columns after it are the fields you converted.
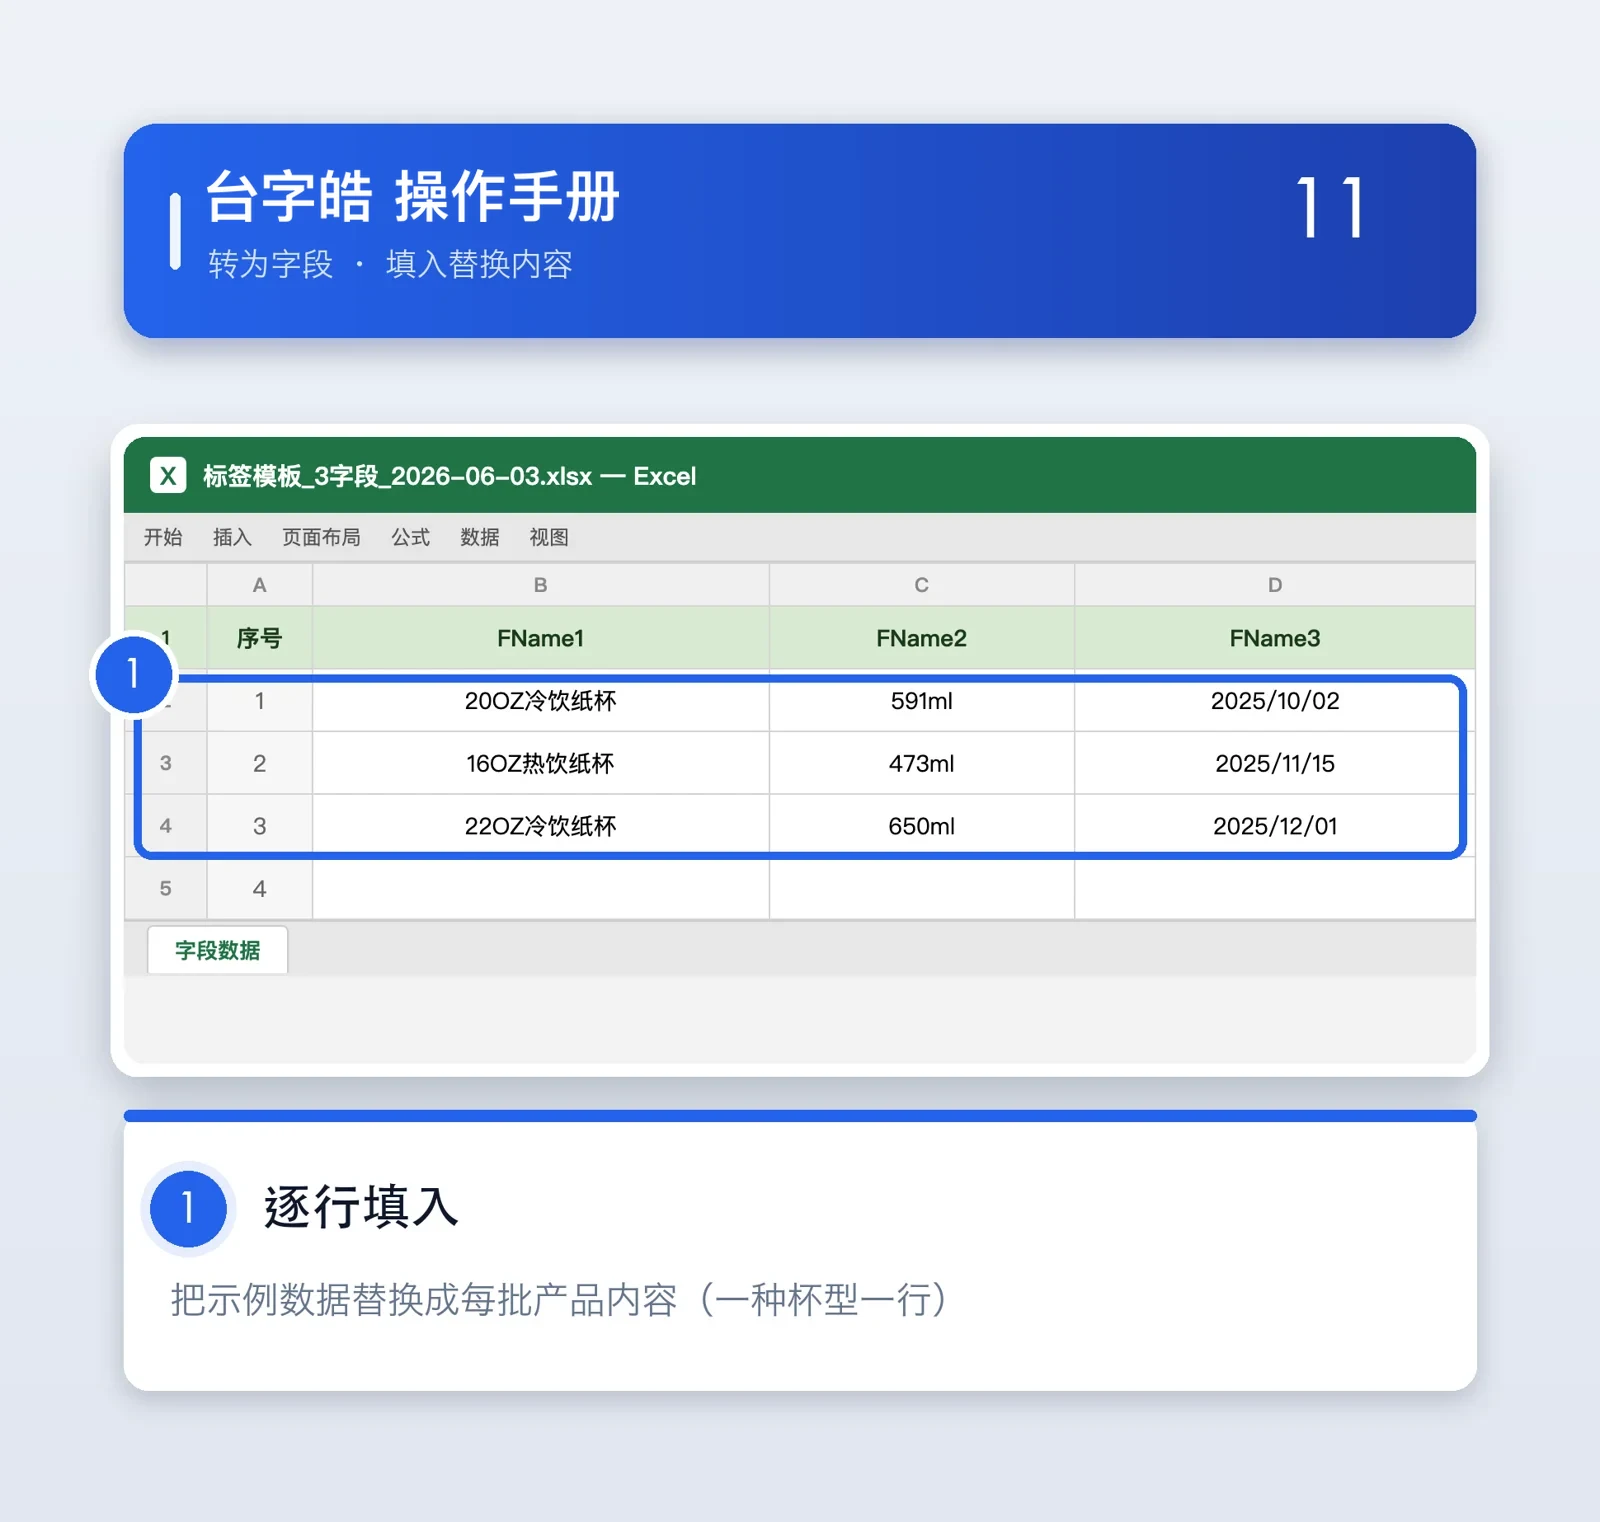
Fill in the replacement text
Fill in the Excel column by column
Fill in the text to be replaced column by column in Excel, one row per label, and each row generates one template. Do not change the header row — the import will fail if you do.
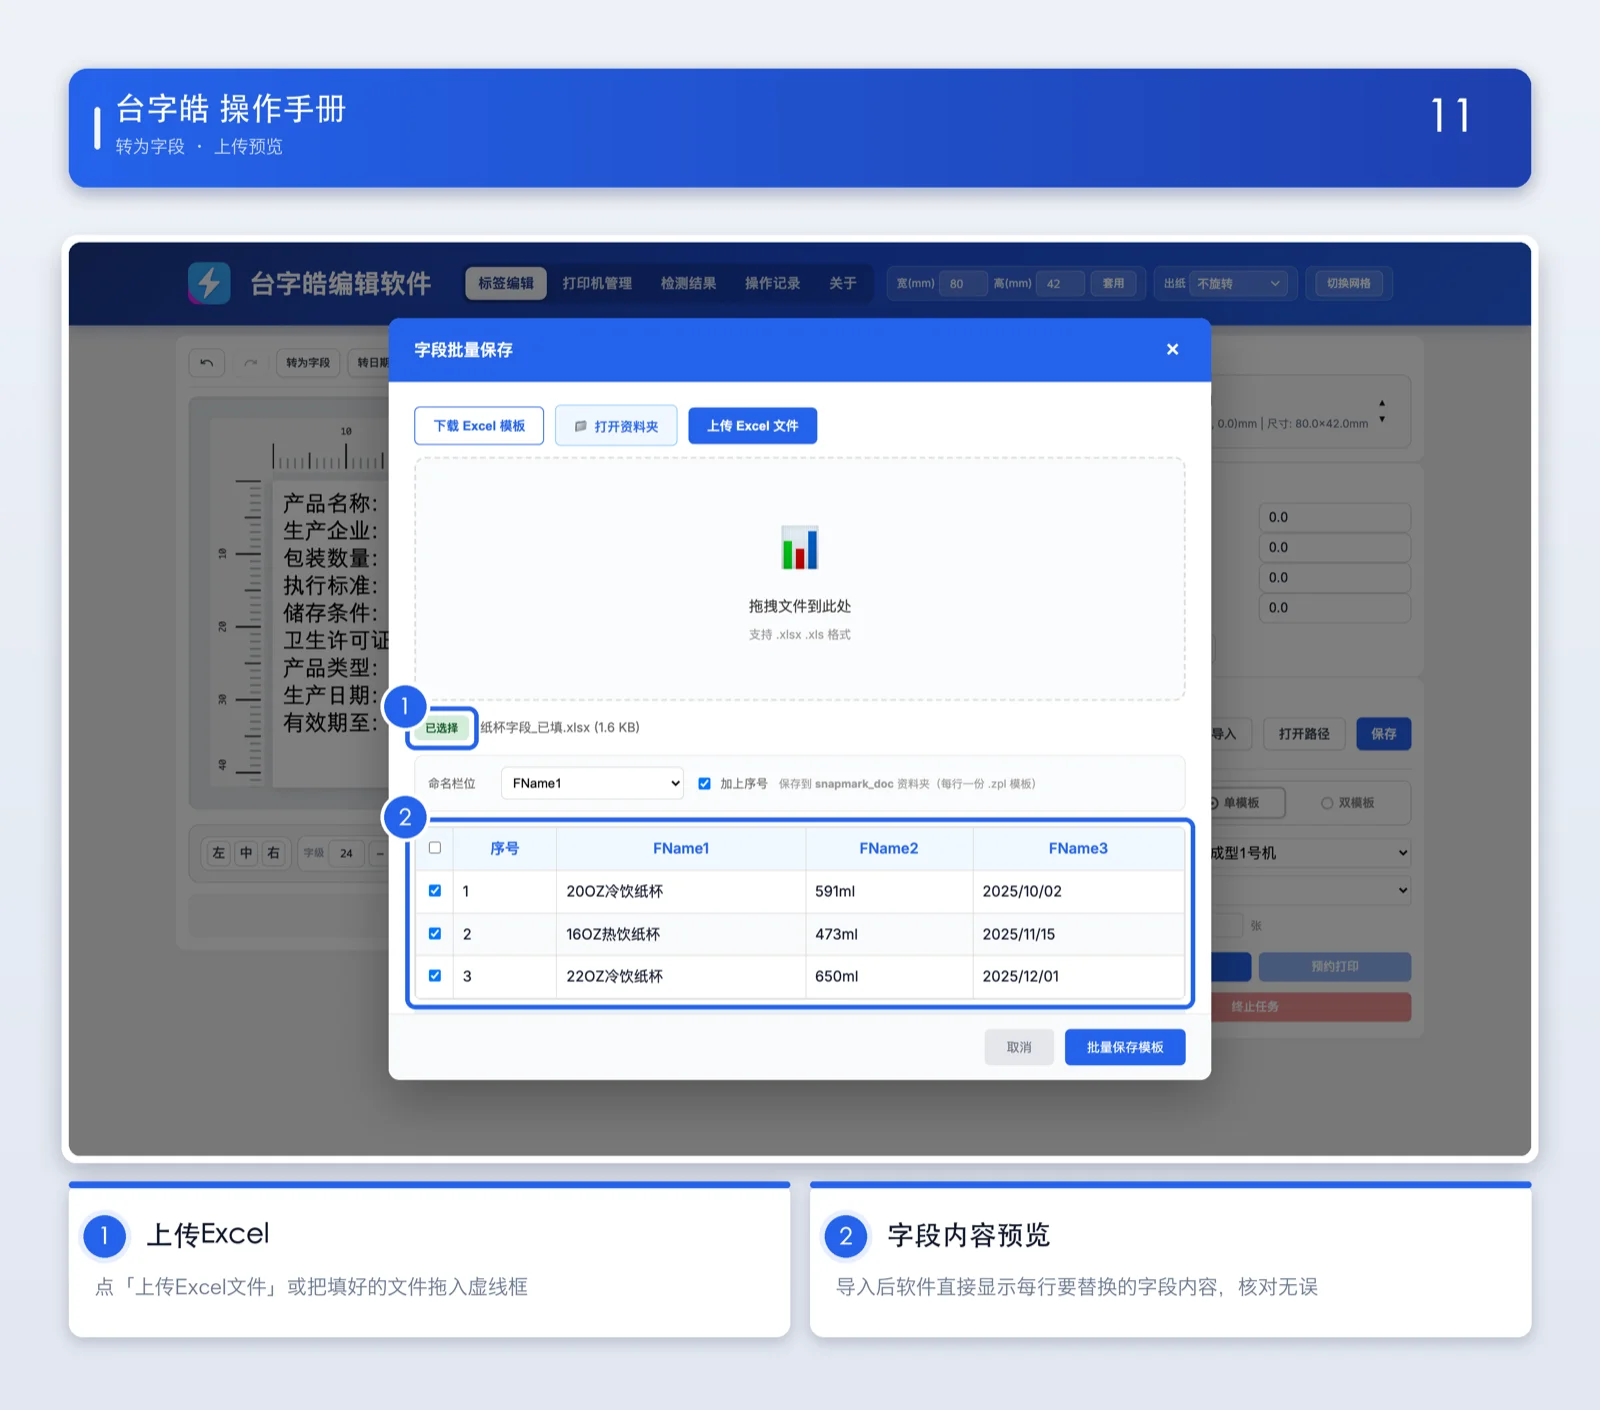
Upload the Excel and preview
Import and preview
Click “Upload Excel file”, or drag the file straight onto the window, to import the data you filled in.
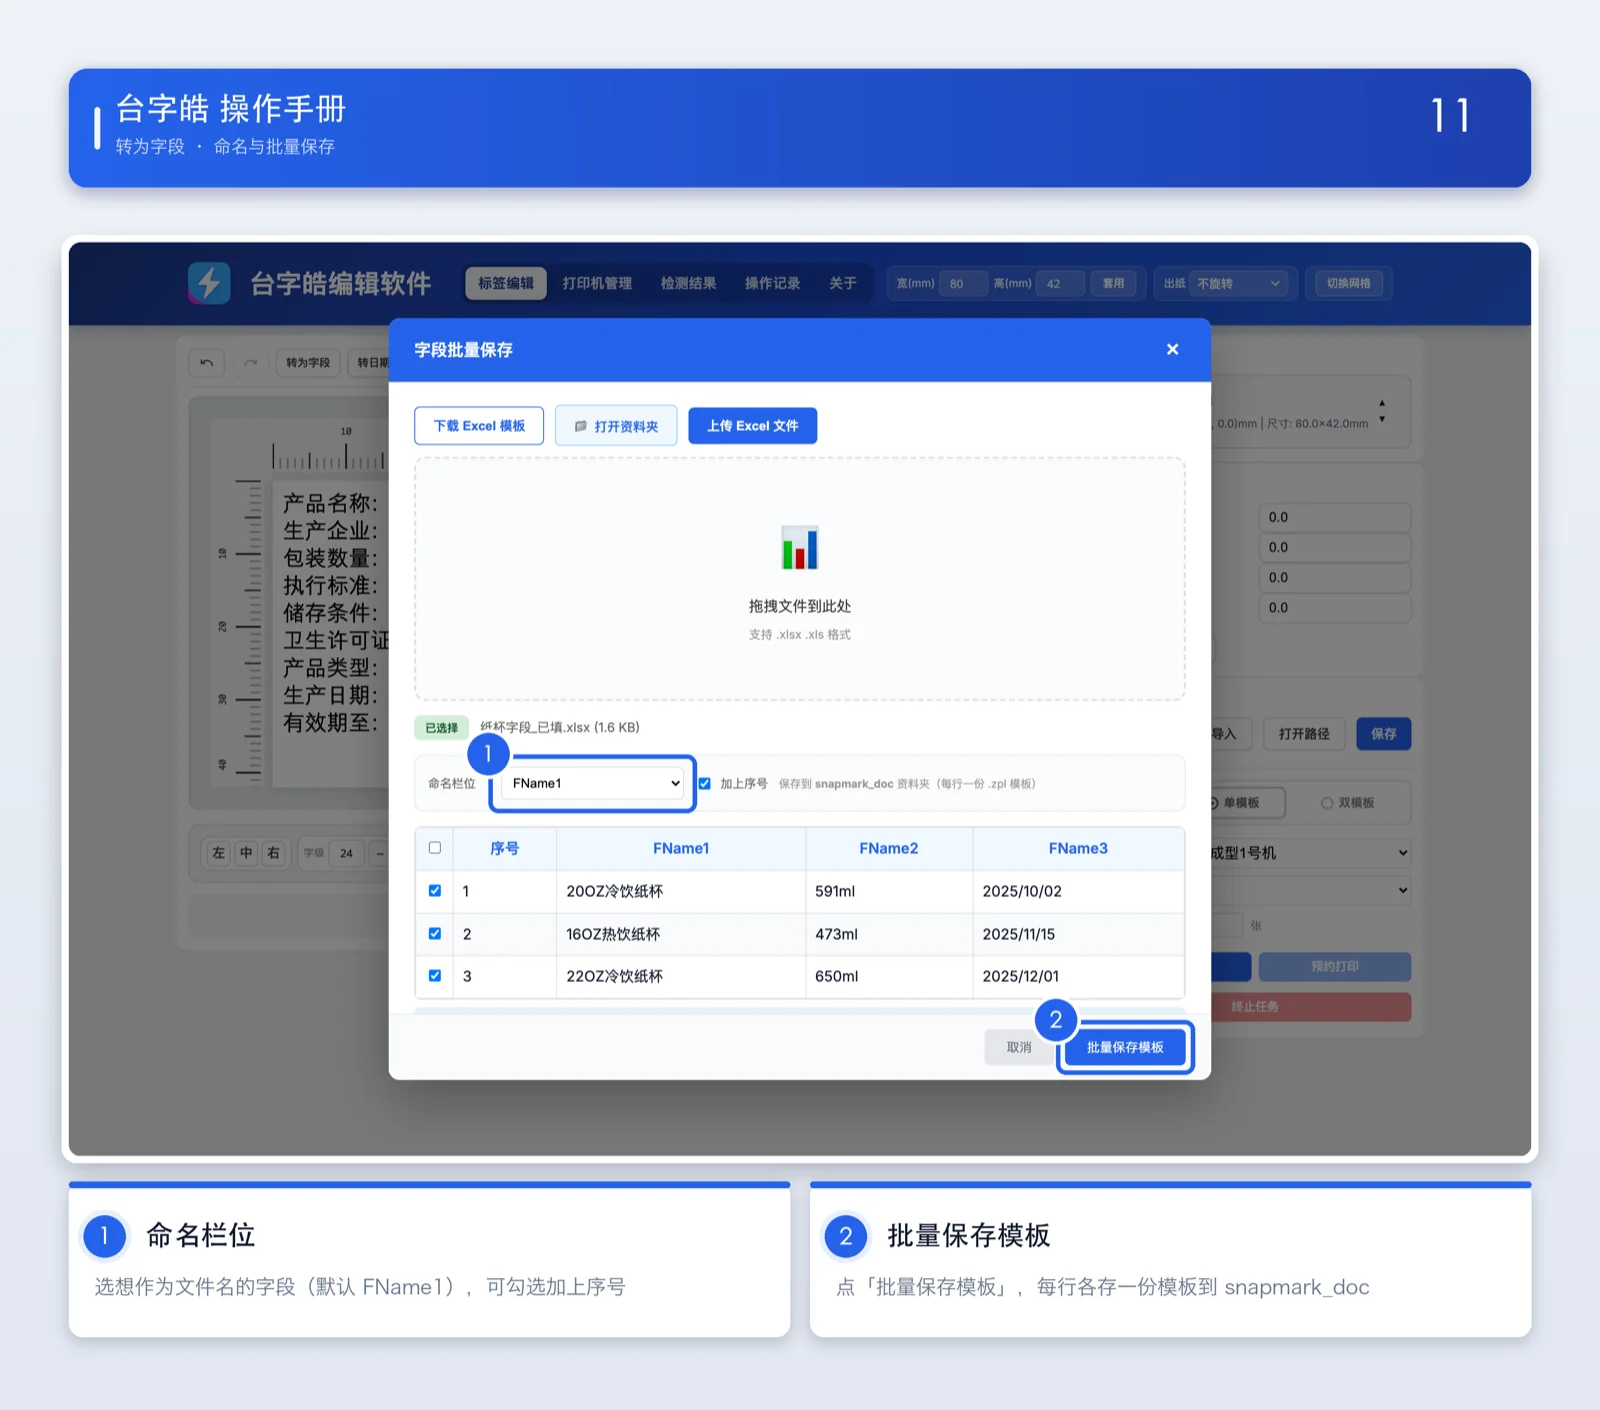
Batch save templates
Name column and save
In “Name column”, choose the Excel field to use as the file name, then click “Batch save templates” to save every row as its own template in snapmark_doc.
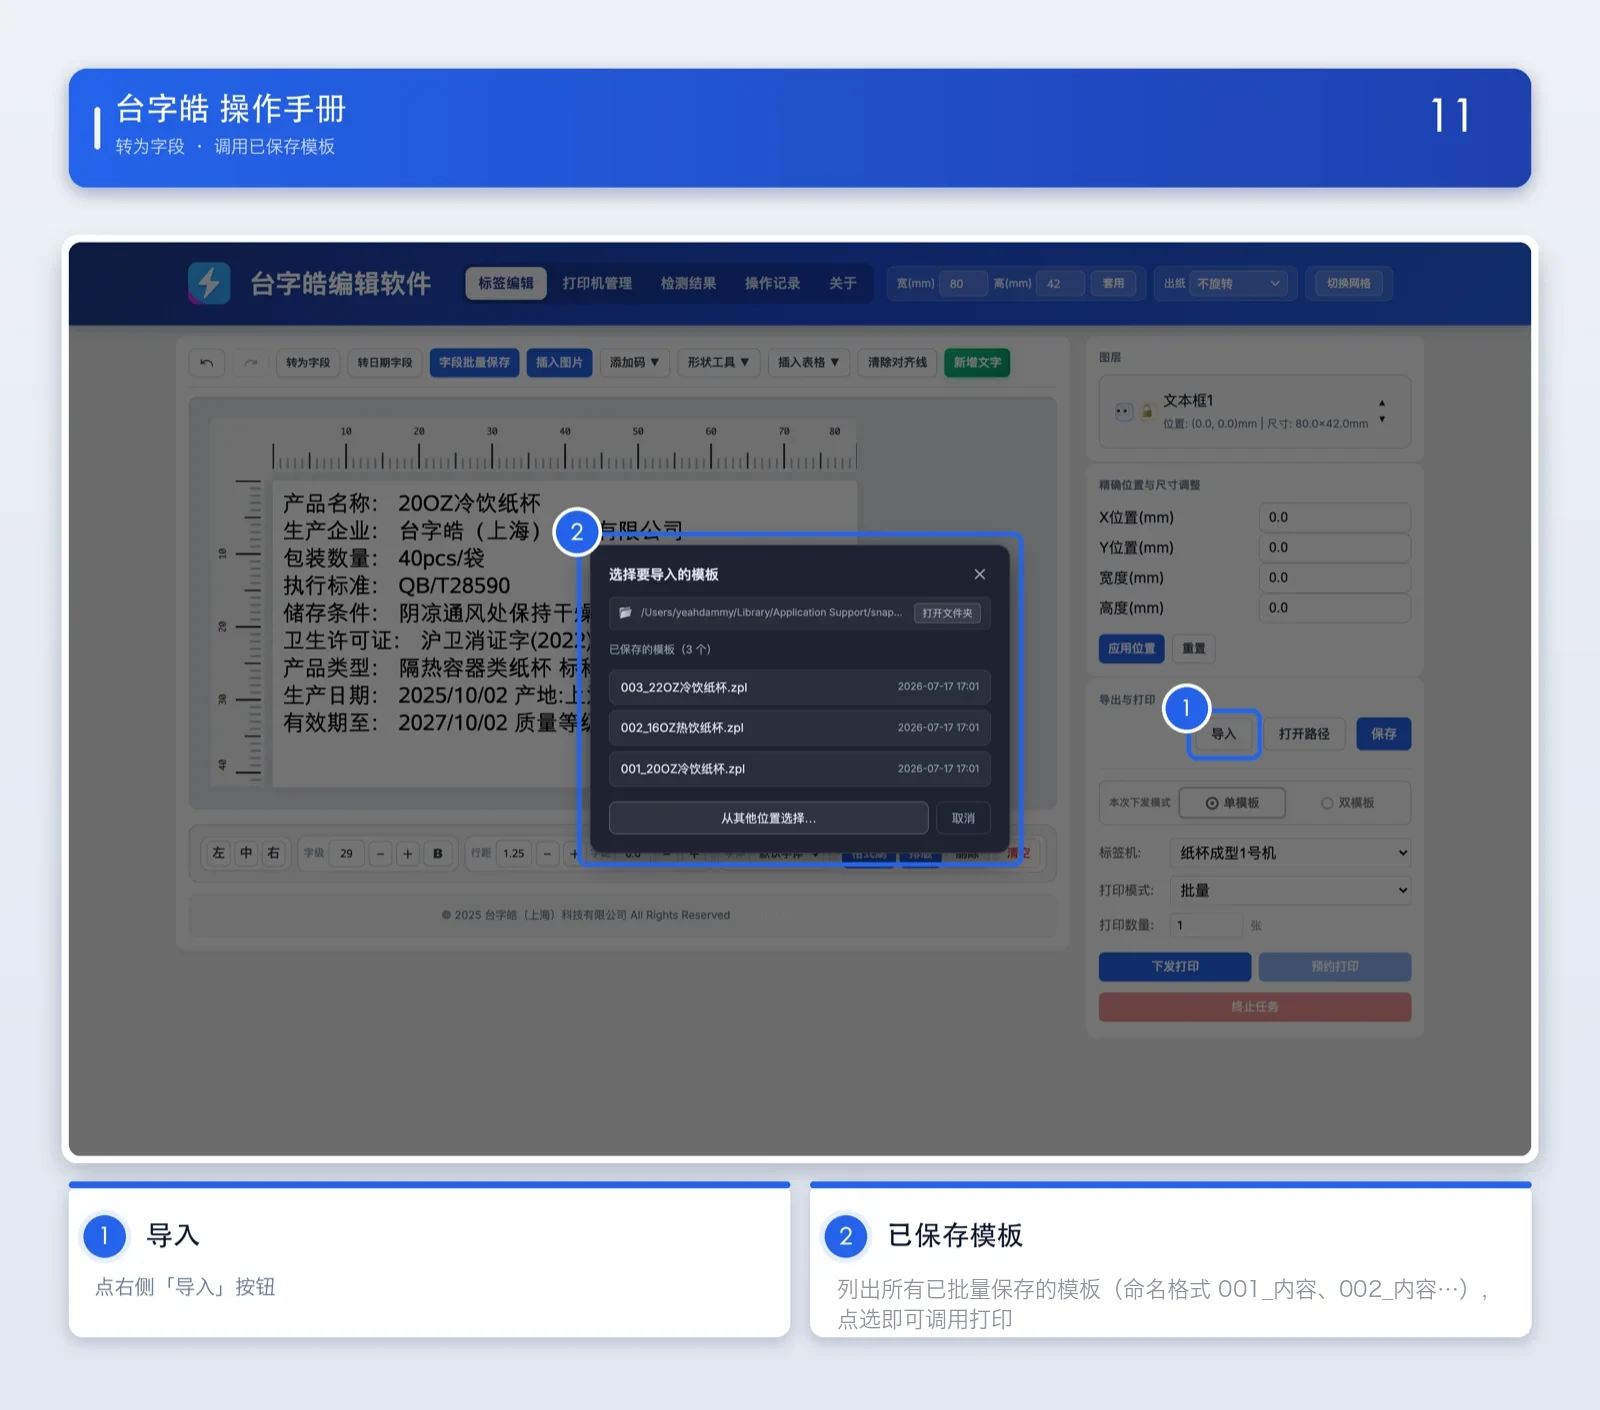
Open a saved template
Import a saved template
After the batch save, click “Import” on the right of the editor to see every saved template (named 001_content, 002_content and so on). Pick one to open it.
Convert to a date field
Turn a date on the label into a “date field” so it shows the current date when it prints. You can set the format and an offset.
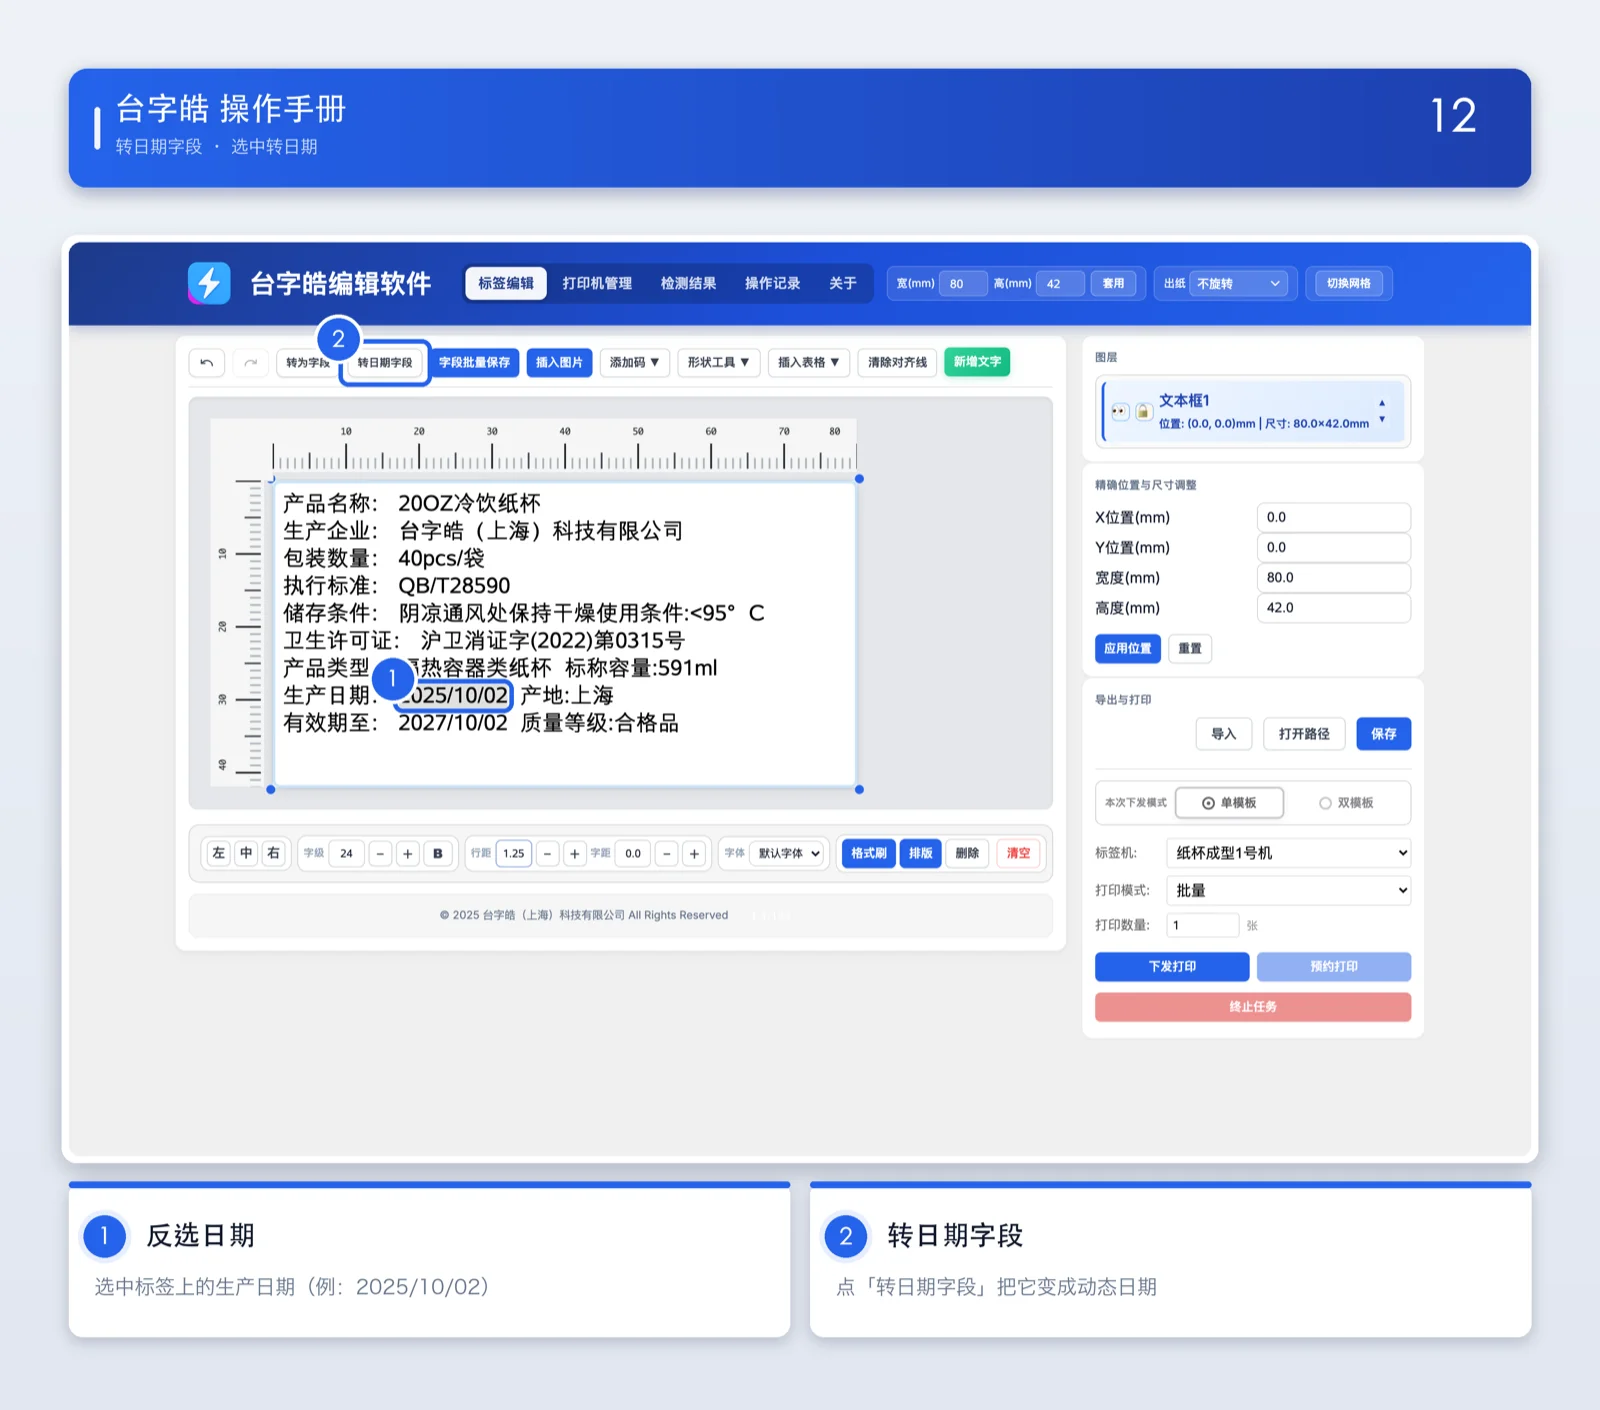
Select a date and convert it to a date field
Select it and convert to a date field
Select the text you want to turn into a date and click “Convert to date field”.
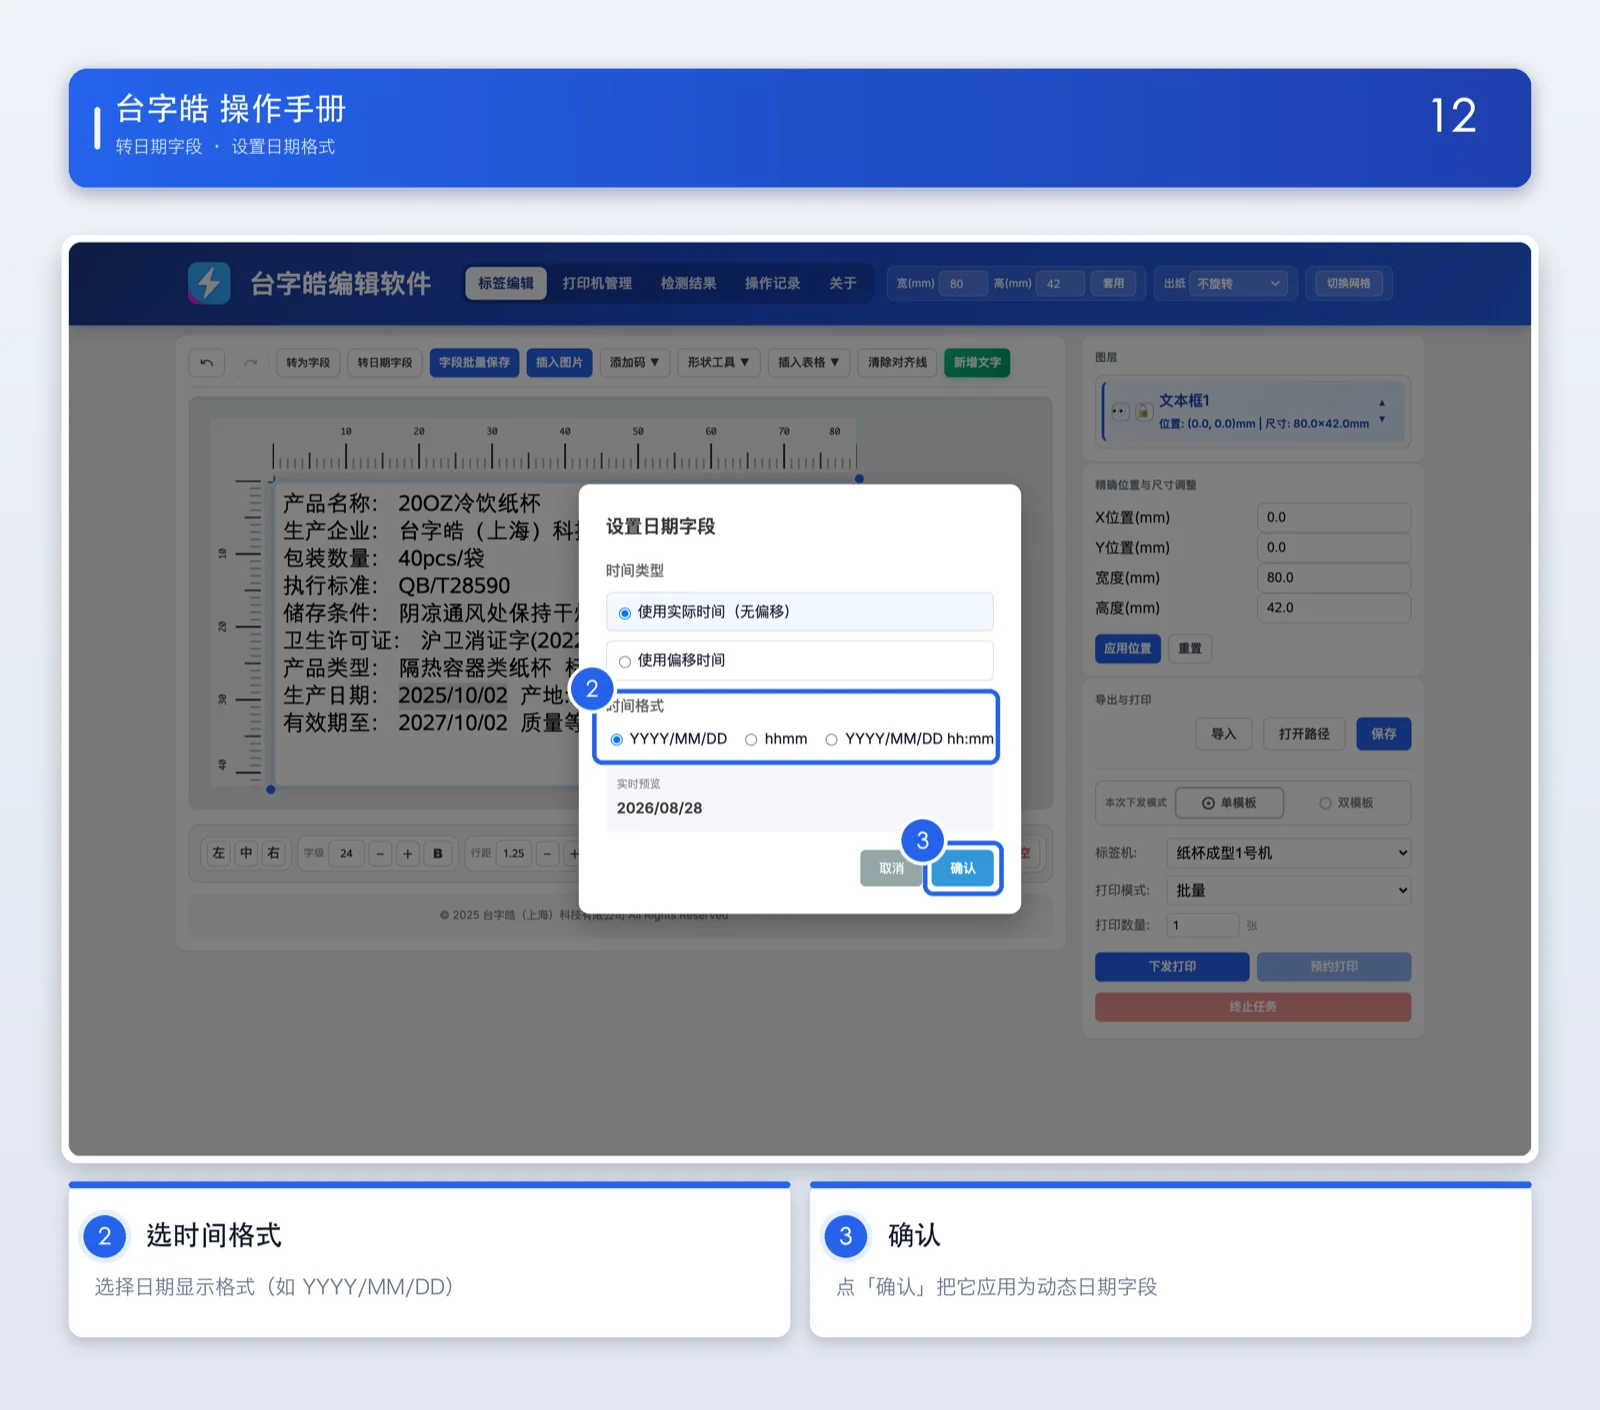
Set the date format
Time format and confirm
The date field dialog opens. There are only three time formats: YYYY/MM/DD, hhmm, and YYYY/MM/DD hh:mm (no custom formats).
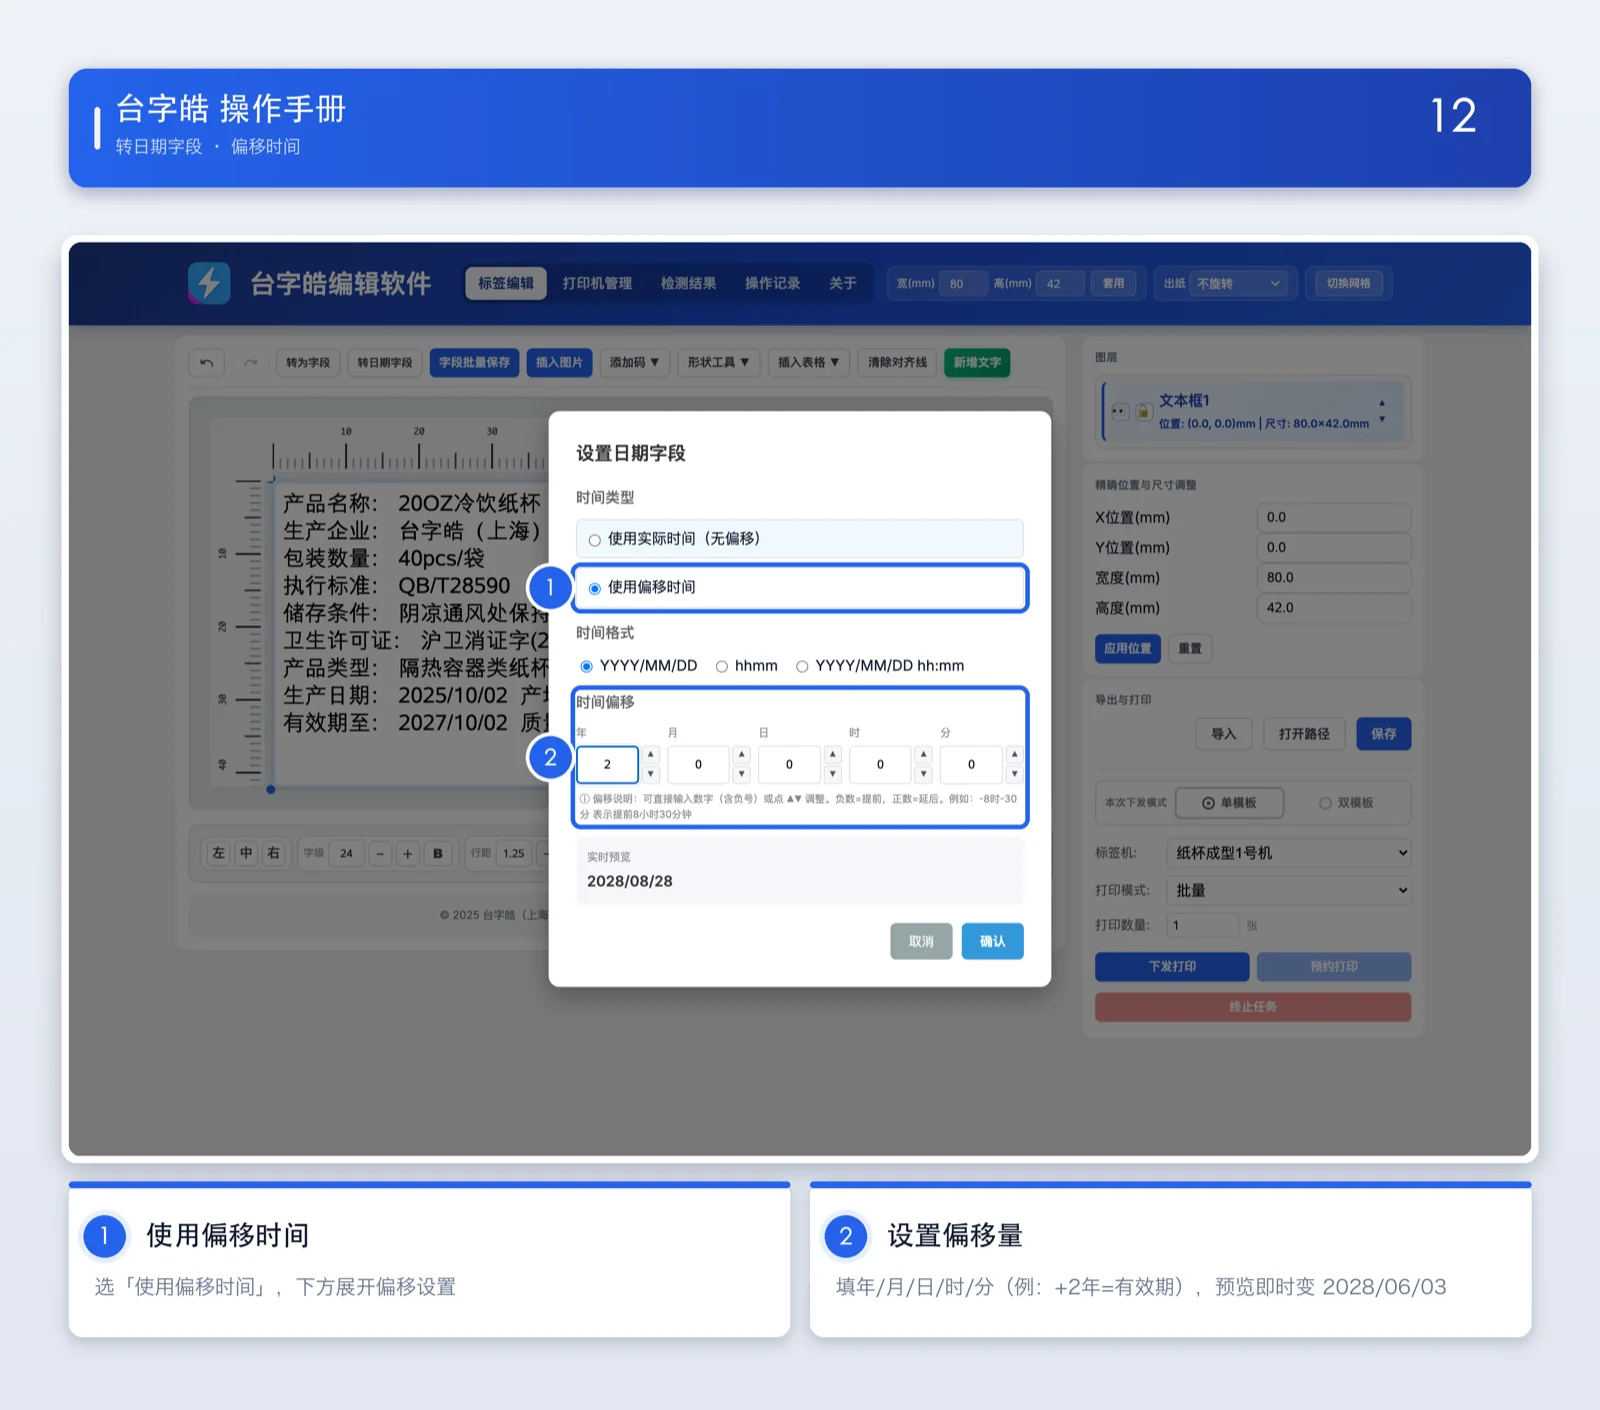
Time offset (optional)
Dynamic offset
You can use an offset: + days, − days, + years and − years are available, so the printed date can lead or lag the real date.
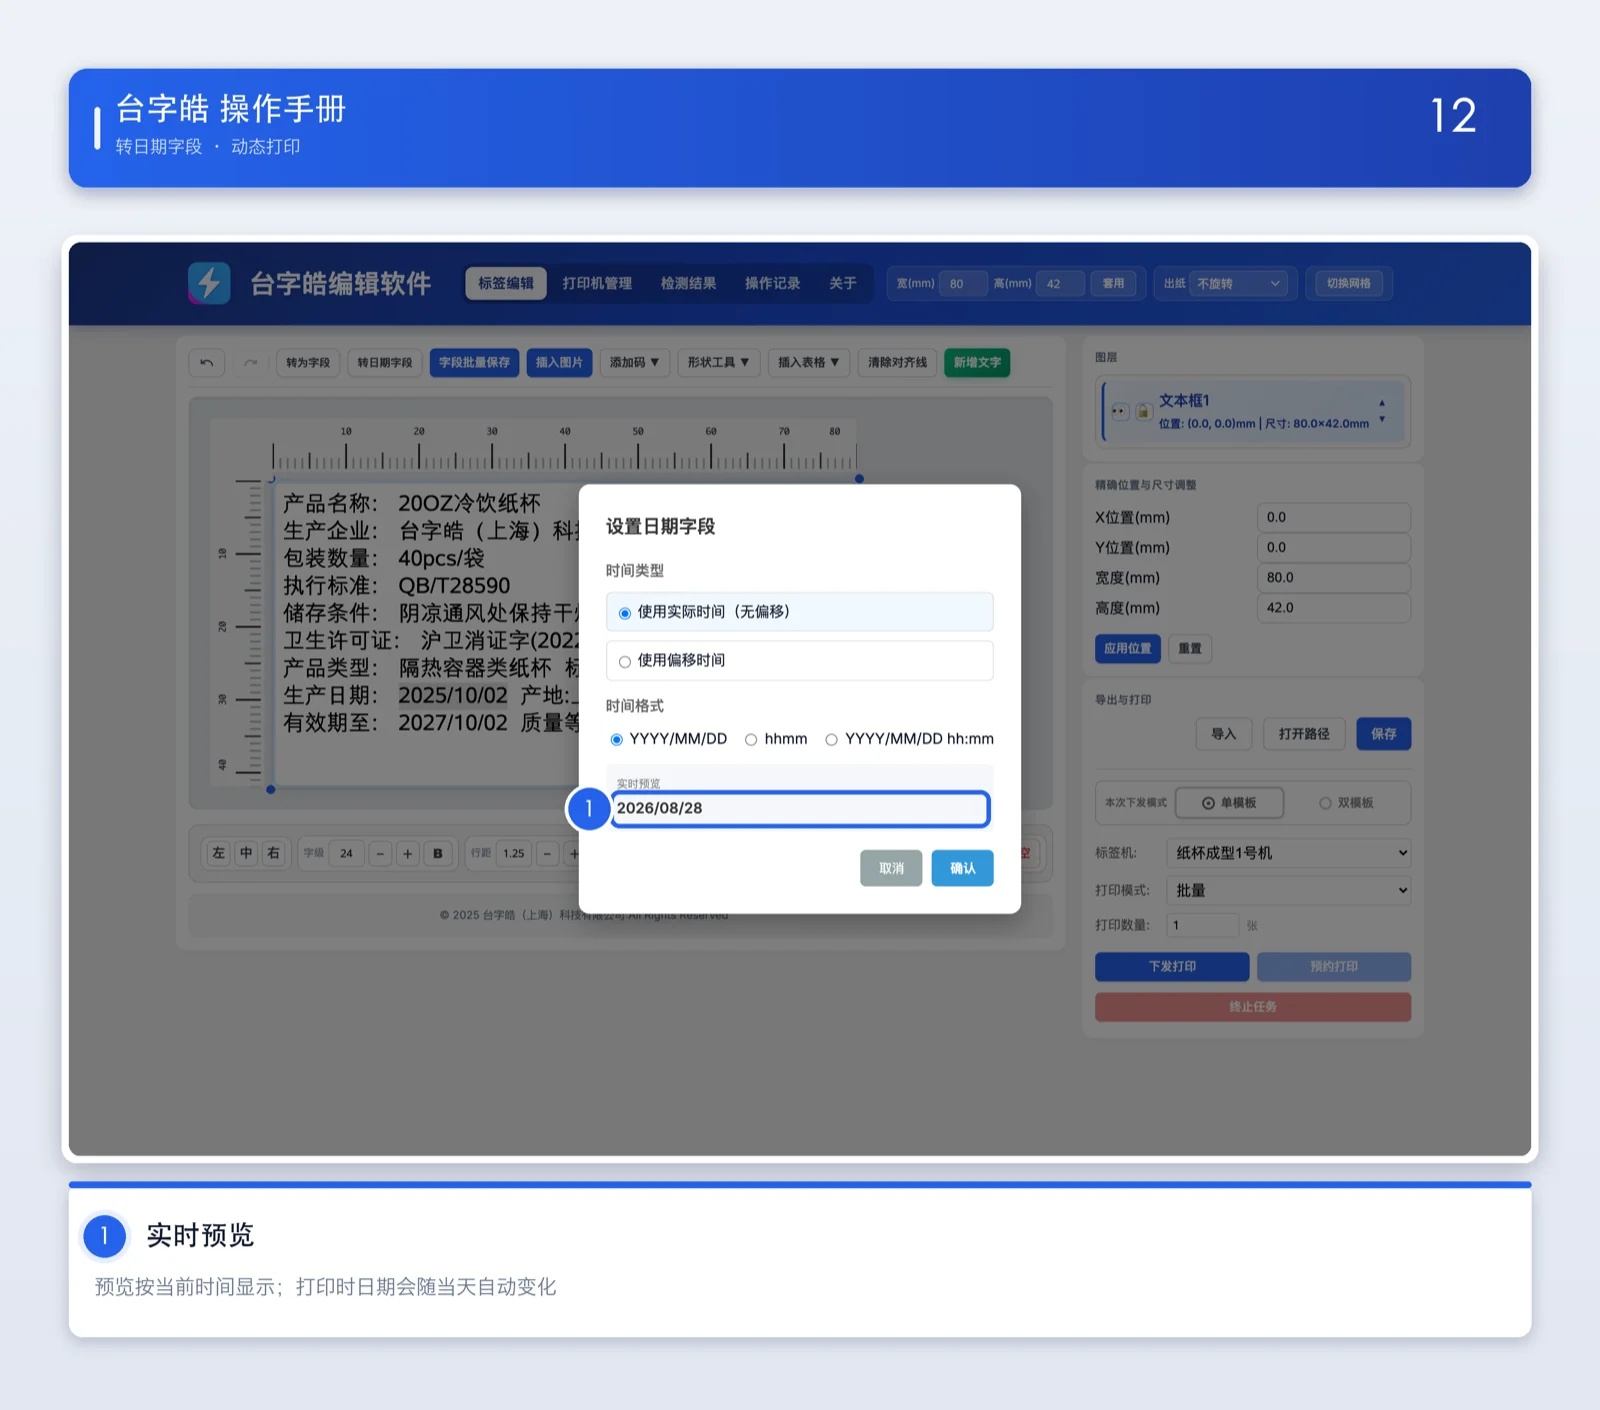
Updates as it prints
Shows the current date
Once set, the date field updates itself from the current time every time you print — no more editing it by hand.
Add a table
Insert a table on the label with the rows and columns you want, drag to resize it, and double-click to type and format the text.
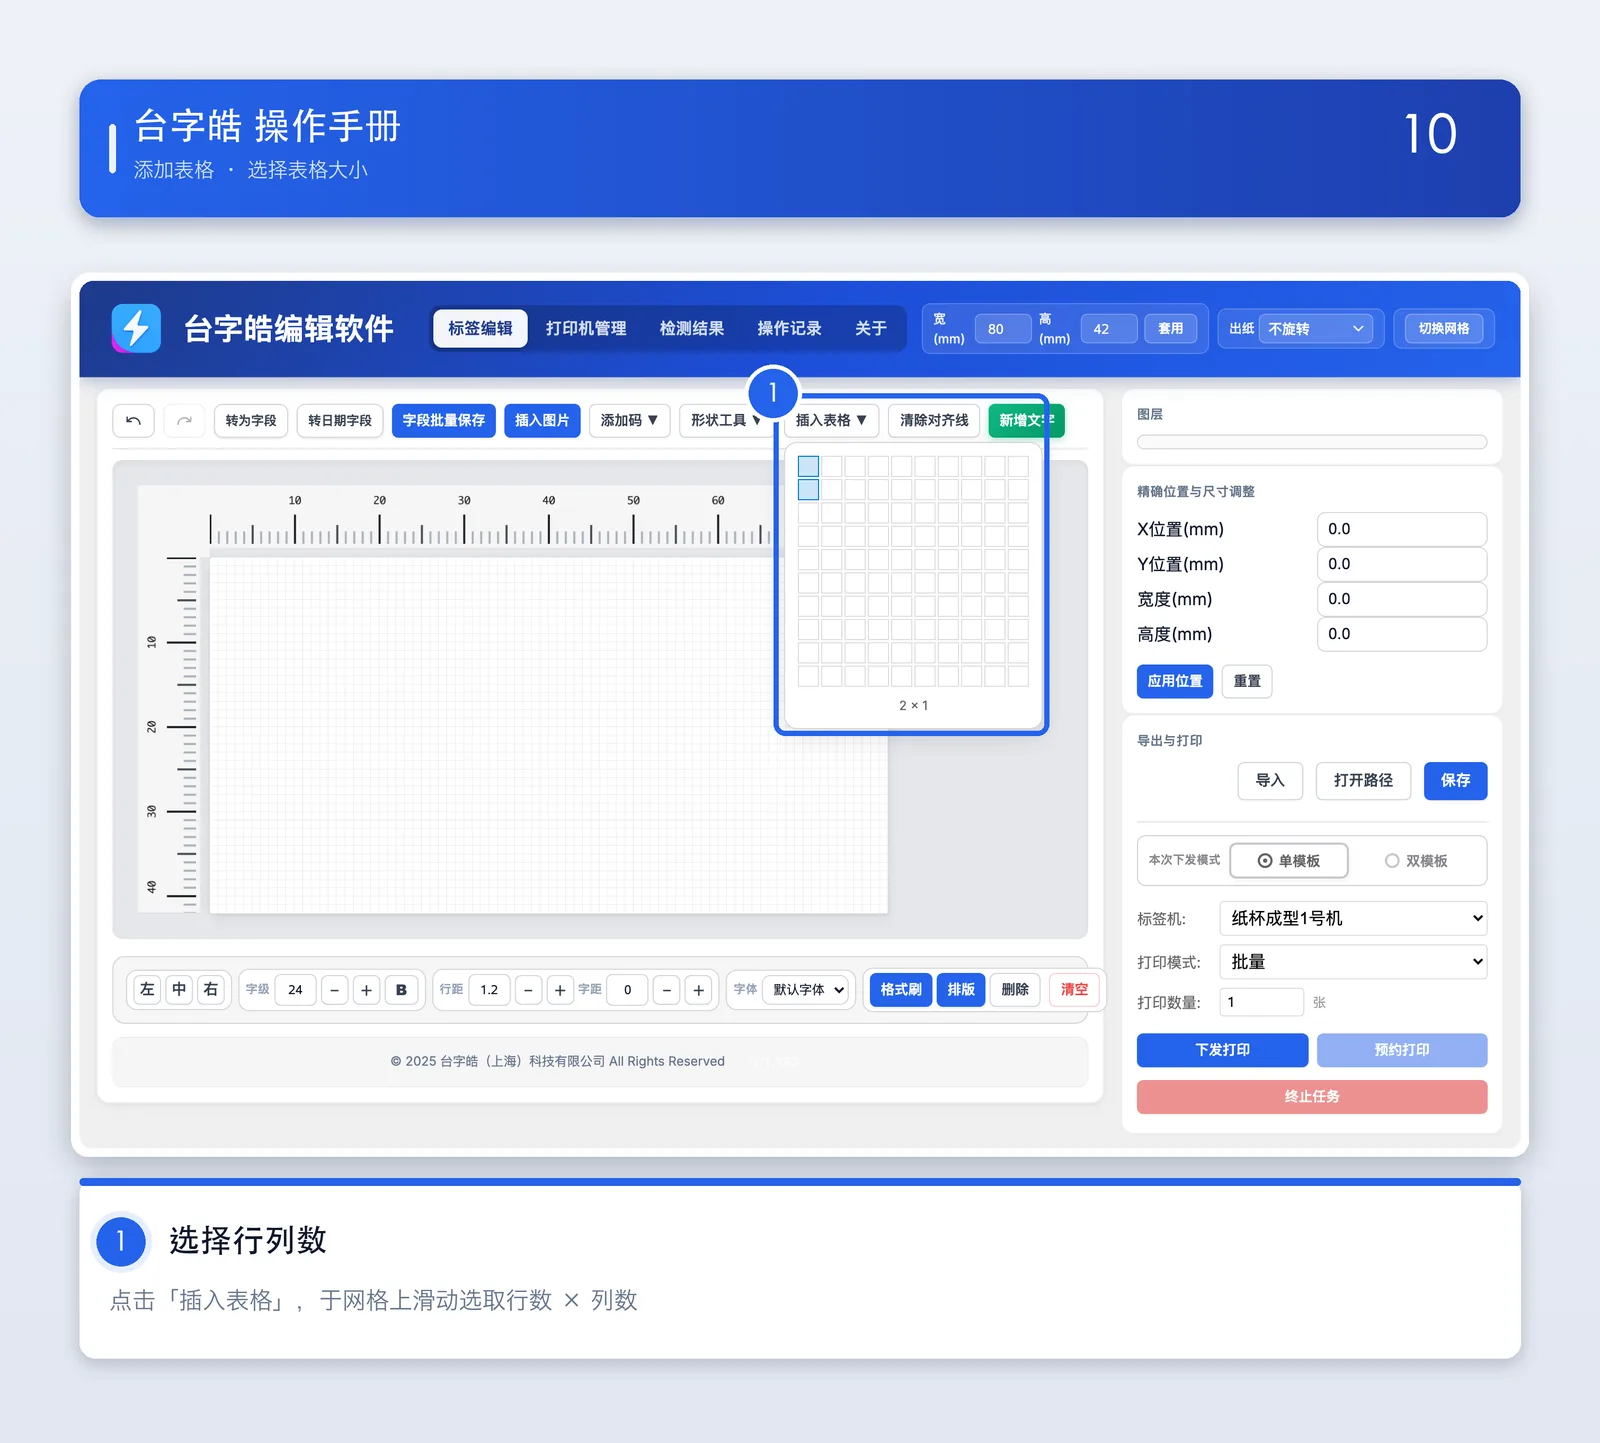
Insert a table
Choose rows and columns
Click “Insert table”, choose the number of rows and columns, and it is inserted.
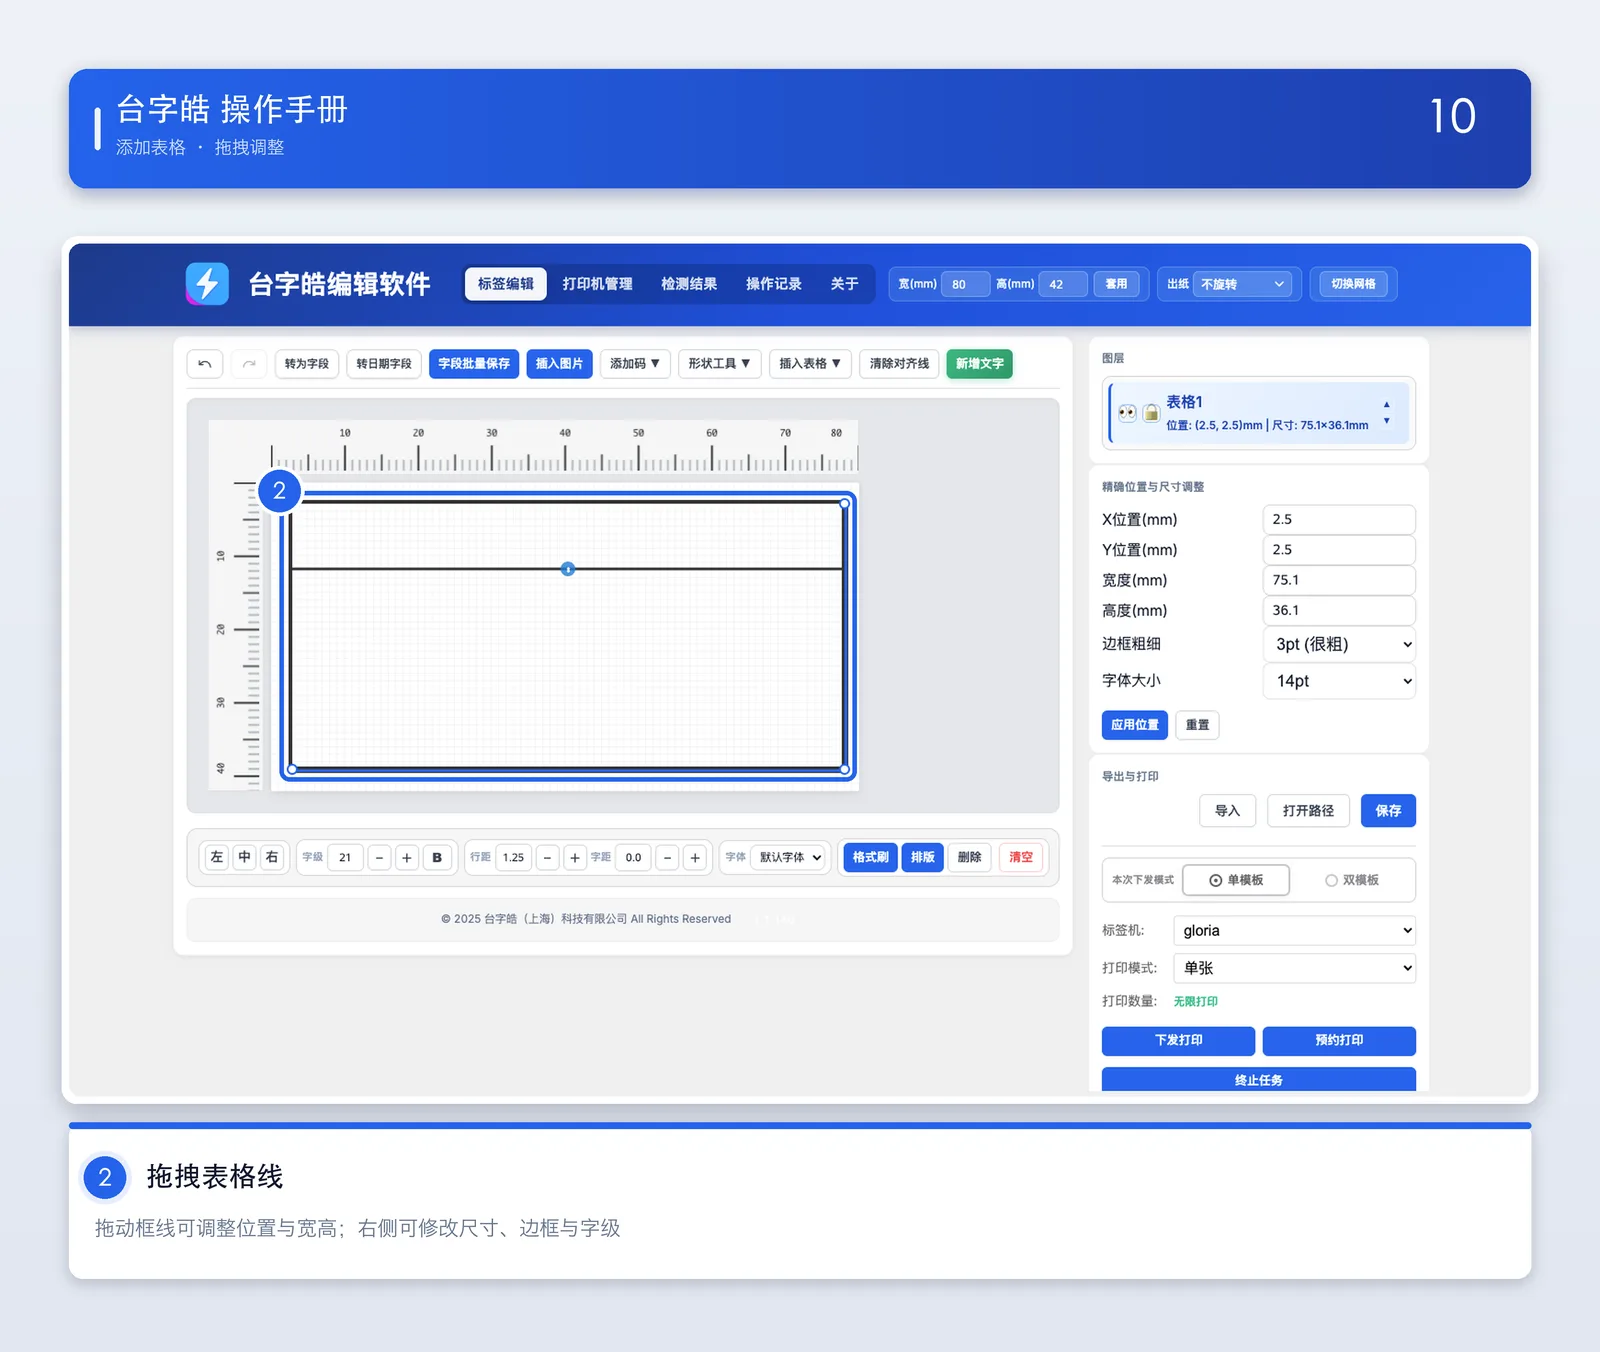
Drag to resize
Drag the table lines
Once inserted you can drag the table lines to move it or change its width and height.
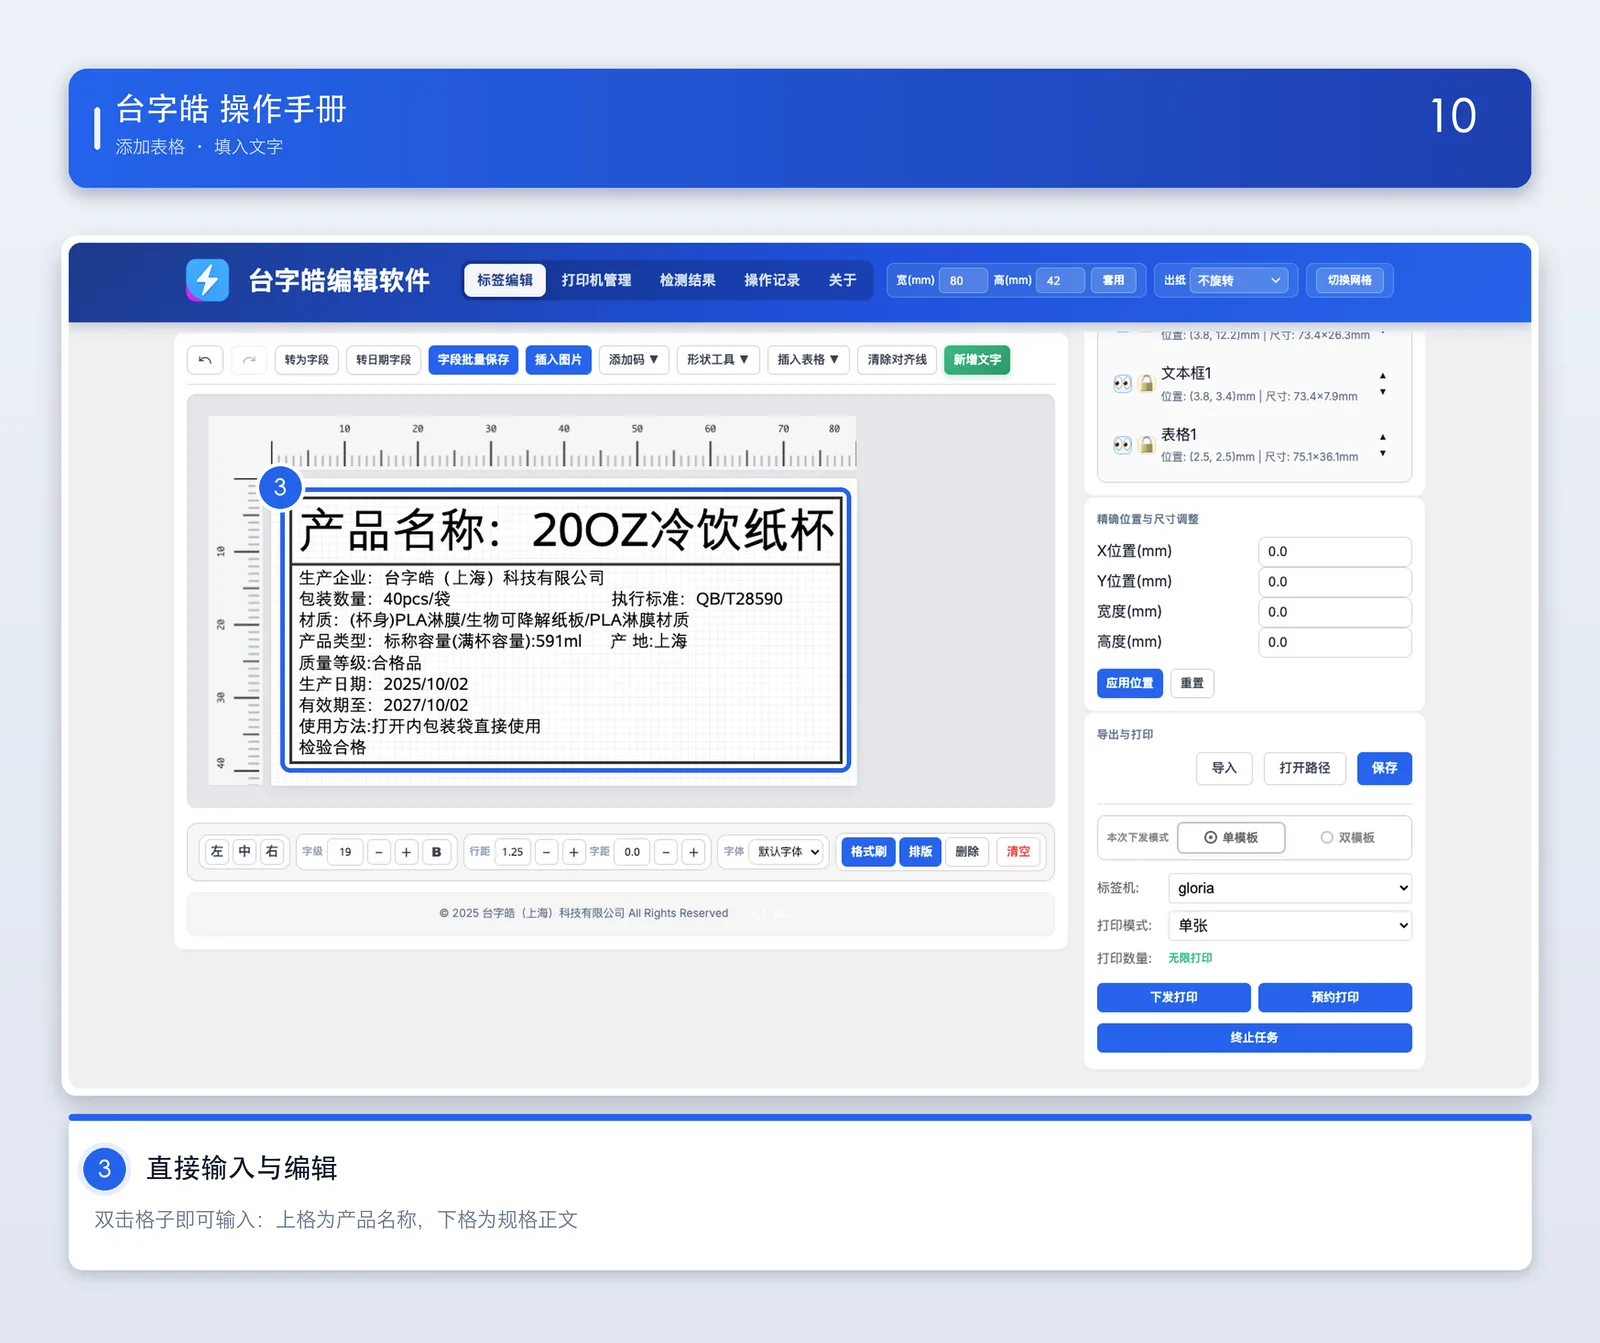
Type directly in the cell
Type and edit directly
Double-click inside a table cell to type in it. Put the product name in the upper cell as a heading and the specification or details in the lower cell. Text wraps to fit the cell automatically.
Bulk WiFi setup
Once the printers are on the network by cable for the first time, you can put several of them on the same WiFi in one go. After the switch they move to the new subnet, so the computer has to move to that subnet too before it can reach them.

Bulk WiFi setup
Open the setup window
In “Printer management”, press the “Bulk WiFi setup” button at the top to open the setup window.
Enter the WiFi name
Press “Scan” to list nearby WiFi networks and click one to fill it in, or type the name yourself.
Enter the WiFi password
Type the network’s password in the “WiFi password” box.
Tick the printers to configure
Tick the machines under “Select the printers to configure”, or press “Select all” to take them all at once.
Apply
Click Apply to the selected printers. A reminder appears first: after the switch you must put the computer on the same WiFi before the machines can be found.
Check the result
Each printer shows one status line. There are four:
✓ Connected: the printer has confirmed it is on the new WiFi.
○ Sent, confirm after scanning: the command was delivered and the printer drops off the network while it switches. Put your computer on the new WiFi, press Scan, and the line turns to ✓ once the connection is confirmed.
✗ Send failed: the printer never received the command and nothing was changed. Check that it is online and try again.
✗ Switch failed, reverted to the old WiFi: the new WiFi did not connect (a wrong password, for example). The printer has restored its previous network and the old settings are untouched. Fix the problem and try again.
Once every printer is done the window shows a summary: “WiFi setup: X succeeded, Y failed, Z awaiting confirmation.” Check it, then unplug the network cable.
Inspection results
After each label is printed, the camera in the machine photographs the result and compares it with what was sent. This page lets you look through the inspection images day by day, and see the totals for a period.

Image view
Two tabs
Image view shows the inspection images one at a time; Report view shows the totals for a period.
Choose a machine and a date
Choose a printer first, then use the left and right arrows to move a day at a time, or click the date to pick one. Press Query to load the inspection images for that day.
That day’s thumbnails
The left-hand column lists that day’s inspection images newest first; click one to see it full size on the right.
Full image and red boxes
On the right is what the camera actually photographed. The software compares the two and marks any difference from what was sent with a red box.
Full screen
Click Full screen at the top right to see the detail, and move between images with the arrows.

Report view
Pick a date range
Enter a start and end date, or use Last 7 daysLast 30 days directly, then press Query to see the summary for that period.
Reject report
The three boxes at the top are the totals for the period: number of inspection images, number of days covered, and the daily average. Below that, each day is listed with its count and share; days with a high count are marked in red. Click the blue date to jump straight to that day’s inspection images.
Operation log
The “Operation log” page records every print and every settings change automatically, so you can trace who did what and when.

Operation log
Logged automatically
More than printing is logged. “Send to print” and “Queue print”, along with setting changes, WiFi changes, time-zone changes, turning inspection on or off, pushing updates and cancelling jobs, each add their own entry.
What you see
The table shows time, action, template, machine, operator, quantity, thumbnail and status; click a thumbnail for the full image. The status bar above shows the total count, and if a record has been tampered with the system shows a ⚠️ Record anomaly warning.
Filter and search
Filter by date range, printer, action type or keyword and press “Query”; press “Reset filters” to see everything again.
Export to Excel
Press “Export to Excel” to save the current operation log as an Excel file.
Editor tools
Besides text, tables and fields, the editor can place images, add QR codes and barcodes, draw lines and frames, and set the typeface and paper direction for the whole label.

Images · Codes · Shapes
Insert an image
Click Insert image and pick a picture to place on the label. With the image selected you can adjust its opacity on the right; clear the Keep aspect ratio checkbox to stretch it freely.
Add a code
Use the Add code drop-down to insert a QR code or barcode and type its content. Whether the human-readable characters appear beneath the barcode is also up to you.
Shape tool
The Shape tool drop-down inserts a solid rectangle or a line, for dividing areas, drawing a frame or underlining.
Undo / redo
If something goes wrong, press Undo at the top left to step back, or use Ctrl+Z to undo and Ctrl+Y to redo.
Toggle grid
Toggle grid turns the squared background of the editing area on and off to help you align things. It only affects the display, never the printed result.

Text layout and paper direction
Font size · Line spacing · Letter spacing · Typeface
Select the text you want to change, then use the row below to set the font size, B bold, line spacing, letter spacing and typeface. With nothing selected, the change applies to the whole block.
Format painter
Format painter copies text formatting. Select the text you want to copy the style from, click Format painter to pick it up, then select the text you want to apply it to and the same formatting is applied. It works across text boxes. Press Esc, click an empty part of the canvas, or click Format painter again to leave the mode.
Paper direction
Paper feed in the top bar offers no rotation, 90° counter-clockwise or 90° clockwise. Use it when the direction the paper is loaded does not match your layout.
About
The last tab in the top bar. These two features are the ones you will need when contacting technical support.

About
Error log
If something goes wrong, click Export log and send the file to technical support together with a description of the problem.
Diagnostic mode
Turn this on only when technical support asks you to. It records much more detailed information about what the software is doing; remember to turn it off once the problem is solved.
FAQ
Run into trouble? These answers cover the usual problems.
The printer is not responding. What now?
My labels print crooked. How do I fix it?
What safety precautions should I take with the printer?
How should I clean and look after the printer?
How do I edit many existing label templates at once?
Why is some of my data missing after an Excel import?
The printed barcode will not scan. What should I do?
How do I back up my label templates?
Need more help? Contact technical support with the printer model and software version, the exact steps that led to the problem, and a screenshot of the error message if there is one.